Manual
Loudsmith manual
Every feature of the loudspeaker designer, step by step: what is on each screen, what each field changes and what it affects.
How Loudsmith works
Loudsmith designs a loudspeaker in five steps that build on each other: Design and drivers → Enclosure → Crossover → Drawing and build → Shopping and budget. On top of these there are eight tools in the Tools menu. Whenever you change something in any step, the app recalculates the whole design within a fraction of a second: cabinet, crossover, drawing, checks and budget. While it is calculating, “Calculating…” is shown at the top right.
- Everything runs in your browser. The design saves itself to browser storage after every change, so your work is still there after you close and reopen the page.
- The results are model predictions (Thiele-Small, baffle diffraction, crossover model). They reliably show the direction, but we recommend fine-tuning the finished speaker from measurements. The app can load measurements in FRD and ZMA format and use them instead of the model.
- Parts and drivers come from the SoundImports shop range, with prices and stock levels. You can add your own drivers.
If you don’t know where to start, click ✦ Design guide at the top. Answer a few questions and the guide sets up the brief and finds suitable drivers.
The app interface
Header and Project menu
- Project name
- Text field next to the logo (up to 80 characters). It is used in exported file names, in the project library and in the order. An empty name reverts to “My design”.
- ✦ Design guide
- Opens the guide with 7 questions (see Design guide). On a narrow screen it is in the Project menu.
- Project → Start from a template
- Loads a ready-made brief with drivers: Bookshelf 2-way, Bookshelf with radiator, Floorstanding 2-way, Floorstanding 3-way, Needle (1-way TQWT with fixed dimensions and a correction network) and Subwoofer. Before that it clears most manual settings (enclosure locks, cabinet type, fixed dimensions, driver positions, braces, manual crossover, loaded measurements).
- Project → New design
- After confirmation, resets everything to the start (Bookshelf 2-way template). Only custom drivers, driver photos and the VAT setting are kept. A design you have not exported is lost.
- Project → Export project
- Saves a
.jsonfile with everything, including measurements, photos and the PCB. It is the best backup of your design. - Project → Import project
- Loads a Loudsmith project (up to 8 MB). Prices and stock are taken from the current catalogue, not from the day it was saved. If the file cannot be loaded, your current design stays unchanged.
- Project → Share as a link
- Packs the design (without measurements and photos) into a link and copies it to the clipboard. Nothing is stored on a server. Whoever opens the link is asked whether to replace their own design.
- Project → Light / Dark mode
- Switches the colours. It has no effect on the calculations.
- Language
- Switches the texts to one of 11 languages. The calculations do not change.
Results bar
Below the header, every screen shows a summary of the current design. It is recalculated after every change.
- Enclosure
- The chosen cabinet type. If you have not chosen it yourself, it is the type the designer recommended from the simulation. It is changed in the Enclosure step.
- Dimensions H × W × D
- External cabinet dimensions in mm. With a separate tweeter box, the height is the sum of both.
- Volume
- Net internal volume after subtracting the drivers, port and the like. For an open baffle it shows “no cabinet”.
- F3
- Lower bass limit: the frequency where the bass falls 3 dB below the average level. It applies in free space with the chosen placement. Clicking it (“Bass in the room →”) opens the Room tool.
- Deviation
- The largest deviation of the on-axis response from the average in the 100 Hz to 16 kHz band (40 to 120 Hz for a subwoofer). The lower it is, the more even the sound.
- Sensitivity
- Average loudness of the finished speaker at 2.83 V at 1 m (300 to 3000 Hz), crossover included.
- Zmin
- The lowest impedance of the speaker. Below 3.2 Ω some amplifiers may struggle.
- Budget
- Estimated cost for the set number of speakers (a pair by default): drivers, crossover parts, accessories, boards, glue, shipping and reserve. A “+” sign means that some price is missing. It is set in the Shopping and budget step.
- Checks
- Number of failed (✕) and borderline (▲) hi-fi checks. Clicking it opens Check and comparison.
Steps and the Tools menu
The first row shows the five design steps. Steps before the current one have a tick ✓, which only shows progress, not verification. Below each screen there is a bar “← previous step · Step X of 5 · next step →”. Some steps are split into sub-tabs (for example Schematic, Response, Measurements…). The app remembers which one you had open last.
The ☰ Tools button opens: Check and comparison, Room, Sound simulation, Project library, Calculators, Equaliser (DSP), Horn calculator and Article and PDF. Each tool has its own chapter in this manual.
Step 1: Design and drivers
Here you enter what kind of speaker you want and choose the drivers. At the top is a card with a preview of the design, on the left the Brief card and on the right the cards for choosing the woofer, midrange and tweeter.
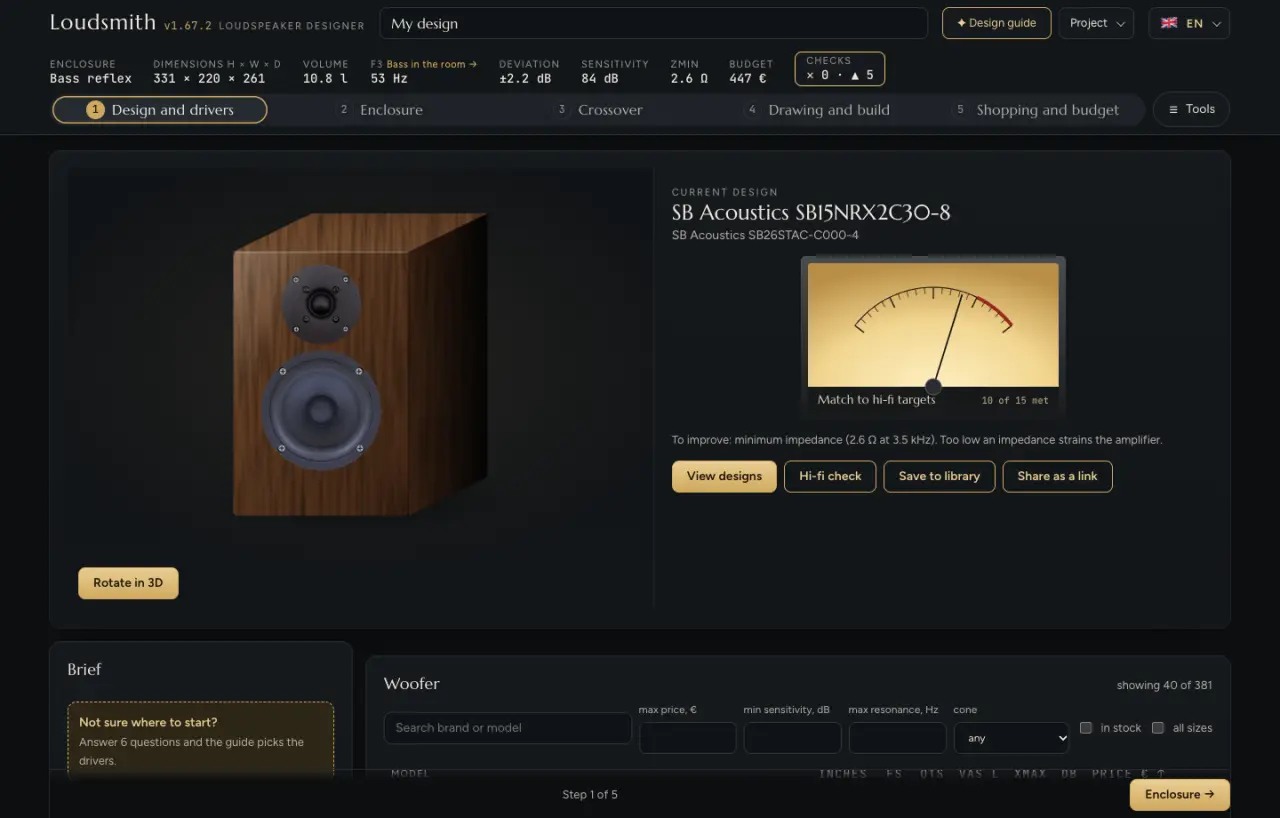
Design preview card
- Speaker preview
- An image of the cabinet based on its dimensions, finish and driver photos. Rotate in 3D loads a 3D model: drag to rotate it, use the scroll wheel or two fingers to zoom, and the Front, Side, Rear and Top buttons turn it to those views.
- Match to hi-fi targets
- A dial gauge showing how many checks pass (for example “14 of 17”). Below it is a sentence with the biggest problem and advice on how to solve it.
- View designs / Hi-fi check
- Jumps to the Enclosure step or to the Check and comparison tool.
- Save to library
- Saves the design (without photos) to “My projects” in the Project library, in this browser, up to 60 projects. A project with the same name is overwritten after you confirm.
- Share as a link
- The same as in the Project menu.
Brief card
- Speaker type
- Bookshelf, Floorstanding or Subwoofer. It determines what size of woofers are offered, the F3 target in the checks (60 / 45 / 32 Hz), the cabinet shape (floorstanding is taller and slimmer) and which enclosure types are calculated (ML-TL only for floorstanding). Changing it sets the default largest volume, target loudness and amplifier power, and clears a manually chosen enclosure as well as a manual crossover. A subwoofer has no tweeter, no midrange and no passive crossover.
- Number of ways
- 1-way (full-range driver), 2-way or 3-way. It determines what crossover is designed and which driver cards you see. With 1-way the crossover is only a correction network; with 3-way a midrange driver is added and chosen automatically. Changing it clears a manual crossover and the chosen enclosure.
- Woofers per cabinet
- 1 to 4 identical woofers. The designer treats them as one larger driver: more woofers need a larger volume, give more loudness and change the impedance. The woofers are stacked one above the other on the front baffle.
- Woofer wiring
- Only with 2 or more woofers. In parallel: the impedance drops (2 × 8 Ω = 4 Ω) and sensitivity rises. in series: the impedance rises and sensitivity stays the same. It affects the crossover and the minimum impedance check.
- Largest net volume
- The upper volume limit within which the designer searches for cabinets of all types (bookshelf up to 30 l, floorstanding up to 120 l, subwoofer up to 150 l). A larger volume allows deeper bass but a bigger cabinet. It also affects the maximum port length and the ranking of the best drivers.
- Priority
- A slider from “deep bass” to “smallest possible cabinet”. The further right, the more the designer favours a smaller volume over a lower F3. It changes the designed volume and tuning of all enclosure types, the recommended type and the dimensions.
- Target loudness, dB at 1 m
- How loud you want to listen (80 to 125 dB). The Maximum loudness and Tweeter power headroom checks are judged against it, and the port size is designed from it.
- Amplifier power, W
- Limits the maximum loudness in the simulation (alongside driver excursion and air velocity in the port). If an active crossover with a Hypex module is switched on in the Crossover step, the module’s power is used and this field is ignored.
- Target speaker sensitivity (0 = any)
- If you enter a number, a “Speaker sensitivity” check is added and the driver search favours drivers with which the speaker reaches this sensitivity. From 90 dB the minimum impedance target rises to 6 Ω, so that the speaker also works with a valve (tube) amplifier.
- Placement
- Free in the room / about 50 cm from the wall / against the wall / in a corner or on a shelf. It does two things: it adds bass gain from the walls (0 to 5 dB) to the simulation, and it sets how much baffle step compensation the crossover designs (4.5 to 1 dB). So it changes F3, the response and the crossover part values.
- Stricter high-end targets
- Changes only the scoring, not the design: the F3 target is lowered to 85 % and the response flatness target goes from ±3 dB to ±2 dB.
- Find the best drivers for this brief
- Compares the woofers in stock: for each one it designs a cabinet up to the largest volume and ranks them by F3, flatness, size and price. The result is the table “Best drivers for your brief” (the top 8 with cabinet, volume, F3, estimated sensitivity and price). Clicking a row sets the woofer and recalculates the design. The cabinet type does not switch by itself.
- Enter custom driver
- Opens a window for a custom driver (see below).
Changing the speaker type or the number of ways returns the crossover to automatic design. If you had values entered by hand in the Crossover step, export your project first.
Choosing the woofer, midrange and tweeter
The woofer card (Full-range for 1-way, Subwoofer driver for a subwoofer) has a table of drivers from the catalogue. The filters change only the list, not the design:
- Search brand or model
- Searches the name and ignores the size filter, so it also finds other sizes.
- max price, € / min sensitivity, dB / max resonance, Hz
- Narrow the list by price per piece, sensitivity and resonant frequency Fs.
- cone
- Paper, metal, plastic, or fibre and composite. Drivers with no material listed are hidden.
- in stock / all sizes
- Only drivers in stock. “All sizes” turns off the selection by speaker type.
Table columns: Inches, Fs (resonance), Qts, Vas (equivalent volume), Xmax (excursion), dB (sensitivity), Price and a link to the shop. Click a column header to sort. Below the name is a quick estimate of the driver’s role and a suitable sealed and bass reflex volume. The “▲ suspicious data” label means that the parameters in the catalogue contradict each other. Clicking a row sets the driver and recalculates the cabinet, crossover, checks and budget. A manually entered crossover is kept but marked as out of date.
Rows marked “▲ fill in data” are drivers without complete parameters. Clicking one opens a window where you fill in the data.
Midrange driver (3-way only) and Tweeter are ranked by how well they suit the chosen woofer: sensitivity (the tweeter should be at least as sensitive as the woofer), lowest possible crossover point, waveguide, power handling, price and stock. Each one has a reason given. Filters: search, min sensitivity, max resonance, for the tweeter also type (dome, ribbon or AMT, compression) and with waveguide, for the midrange the cone material. Clicking selects the driver and recalculates the crossover.
Design guide
Seven questions: where the speakers will play, how much bass you want, how loud you listen, what amplifier you have, how big the cabinet can be, where it will stand and how demanding the build can be. Questions ruled out by your answers are skipped. After Find drivers, the guide loads a clean template, sets up the brief from your answers and runs the search for the best drivers by itself. Note: this clears your previous manual settings.
Custom driver
If a driver is not in the catalogue, enter it yourself. Choose the type (woofer or full-range, midrange, tweeter, passive radiator). In the Paste text from a datasheet field you can paste text from a datasheet or shop page. Fill in from text finds the parameters and converts the units; the fields it found are highlighted. Required fields are marked with an asterisk: for a woofer Fs, Qms, Qes, Vas, Re and Sd; for a tweeter Fs, Re, impedance and sensitivity; for a radiator Fs, Mms or Cms, Sd and Xmax. Add and use saves the driver to the project and uses it straight away. The designer estimates missing data and flags “Driver data completeness” in the checks. Custom drivers are kept even after “New design” and are included in the project export.
Step 2: Enclosure
Here you choose the cabinet type, set its volume, port or radiator, and can enter the external dimensions. The step has the sub-tabs Designs, Dimensions, Response, Loudness and excursion and Impedance. Board material, thicknesses, finish and braces are in the Drawing and build step.
Manual cabinet settings are remembered separately for each type, so they are not lost when you switch between types. However, changing the woofer, speaker type or number of ways in step 1 clears them.
Designs: cabinet types
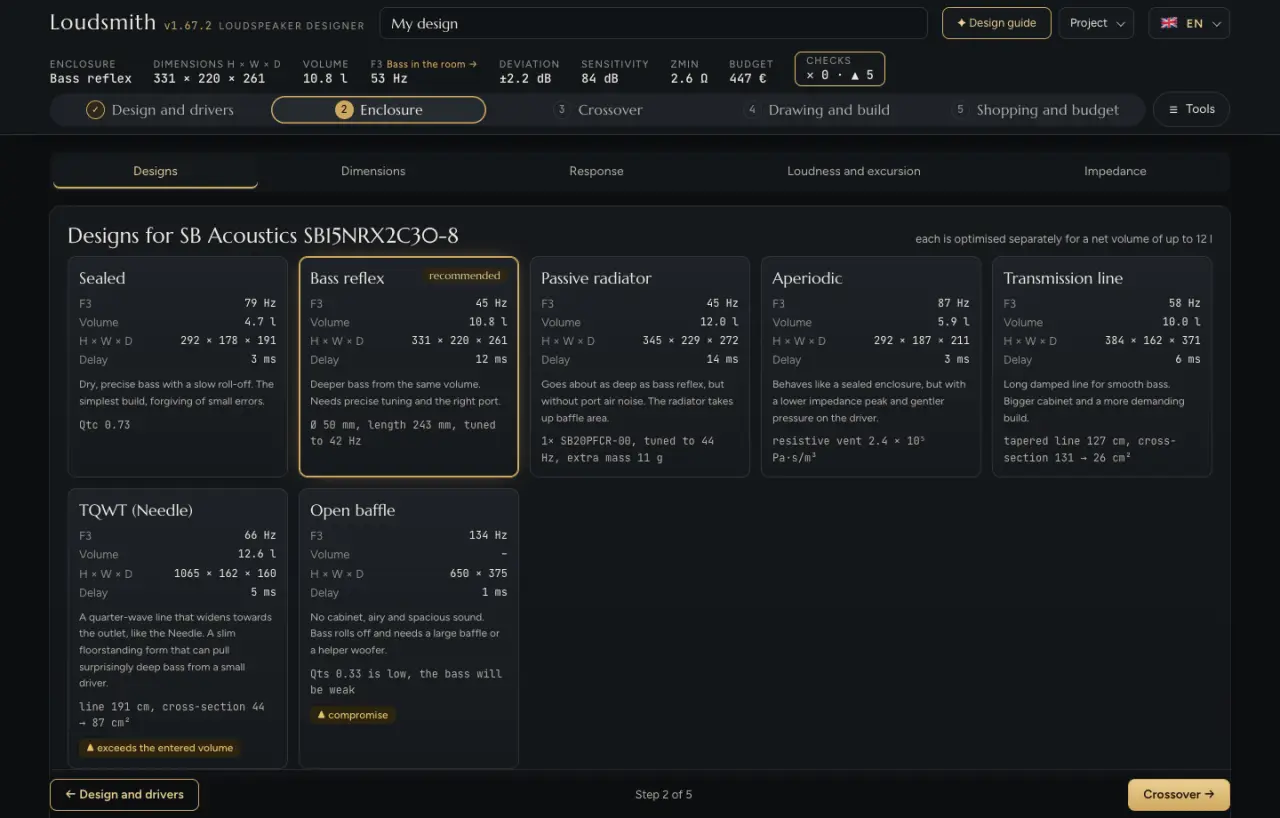
The Designs for … card has a tile for each cabinet type that can be designed for the chosen woofer: Sealed, Bass reflex, Passive radiator, Aperiodic, Transmission line, TQWT (Needle), ML-TL and Open baffle. Each type is optimised separately for a volume up to the largest volume from step 1. Passive radiator only appears when the catalogue has a suitable radiator in stock. ML-TL only appears for a floorstanding speaker.
- Clicking a tile
- Selects the cabinet type. It changes everything downstream: dimensions, graphs, automatic crossover, drawing, cut list, shopping (port, radiator) and checks.
- Data on the tile
- F3 (lower bass limit of the woofer alone in the cabinet), Volume, Dimensions H × W × D and bass delay in ms. A lower F3 means deeper bass, a lower delay means “faster” bass. Below that is a short description of the type and a technical note, for example Qtc, port dimensions, tuning or line length.
- “recommended” label
- The type with the best score: it rewards a low F3 and penalises peaking, dips, large delay and large volume, according to the priority from step 1.
- “▲ exceeds the entered volume” label
- The cabinet came out more than 3 % larger than the largest volume.
- “▲ compromise” label
- The type failed its own criterion, for example a sealed box has a Qtc above 1.0, the port does not fit or the air in it moves faster than 17 m/s, or the woofer’s Qts is too low for an open baffle.
The port note on the tile is from the first design. Once the port is adapted to the actual cabinet depth, it may have a different diameter in the type settings. The value in the settings is the one that applies.
Settings for the chosen type
Below the tiles is a card named after the chosen type. The automatic label means the values were set by the designer. After your first manual change an Automatic button appears, which returns all values of the type to the designed ones. Note: after the first manual change, for bass reflex, radiator and ML-TL the volume and the port or radiator are also locked. Changing the largest volume in step 1 will then no longer move them until you press Automatic.
- Net volume
- The internal air without boards, braces and drivers. It changes the cabinet dimensions and the whole bass (F3, response, impedance, excursion, maximum loudness), for bass reflex the port length and for a radiator the added mass. Not available for Transmission line, TQWT and open baffle.
- Box damping
- From “No damping” to “Whole box filled with dense foam”. Damping material acoustically enlarges the cabinet by 0 to 35 %. For sealed and aperiodic this lowers both Qtc and F3. For bass reflex with automatic port length the tuning stays and the port gets shorter; the tuning drops only with a manually entered port length. For a radiator the added mass is recalculated. In the shopping list the damping material is always one and the same item.
Sealed: shows Qtc. For clean bass the ideal is 0.6 to 0.8.
Bass reflex:
- Tuning (25 to 100 Hz)
- Resonance of the cabinet with the port. Lower tuning gives deeper bass, but a longer port and more excursion below the tuning. If you enter a port length, the tuning is calculated from it and the slider is ignored.
- Port diameter, mm and Number of ports
- A larger port area means lower air velocity, so less noise and higher maximum loudness, but a longer port. It affects whether the port fits and which port is chosen from the shop.
- Port ends
- Plain tube or flared ends. A port with flared ends comes out shorter for the same tuning.
- Port shape
- Straight or with a 90° bend. It changes the drawing, the check for room at the port mouth and the port chosen from the shop. The acoustic calculation does not change.
- Port hole, mm (0 = by diameter)
- Only the hole diameter on the drawing. It does not change the calculation.
- Port length, mm (0 = from tuning)
- When you enter a length, it is fixed and the tuning is calculated from it.
Below the port settings are the tube length, the tuning and the port’s own resonance, which should be well away from the crossover frequency (the “Port resonance” check). If the shop does not sell such a port, the app tells you the closest one it sells and what tuning you get with it.
Passive radiator: Tuning recalculates the radiator’s added mass (weight). Radiator selects a model from the catalogue, which changes the simulation, loudness limit, drawing and price. Number of radiators is 1 or 2 (two go on the side panels). Below the selection is the added mass per radiator. The radiator should displace at least 1.5 times more air than the woofer (the “Radiator displacement” check).
Aperiodic: only volume and damping. The designer chooses the vent resistance.
ML-TL (floorstanding only): volume (changes the line cross-section), port diameter, number and length, and line Damping (more means smoother bass, less means stronger resonances). The line length is the internal height of the cabinet, so you change it with the cabinet height.
Transmission line: Line length (the main tuning parameter), Cross-section at the closed end, Taper (1 = straight line), Driver position from the closed end and Damping. The volume is calculated from the length and cross-section.
TQWT (Needle): line length, cross-sections at the closed end and at the end, driver position, vent area and damping. Below them are the resulting tuning and volume. The Needle ADW geometry button loads the line dimensions from the Needle template and also sets the boards and the external dimensions to 160 × 950 × 196 mm, so it changes the drawing too.
Open baffle: Path around the baffle (0.15 to 1 m). The baffle size is derived from it if no dimensions are entered. A longer path means more bass. If you enter both width and height, the slider has practically no effect.
Dimensions
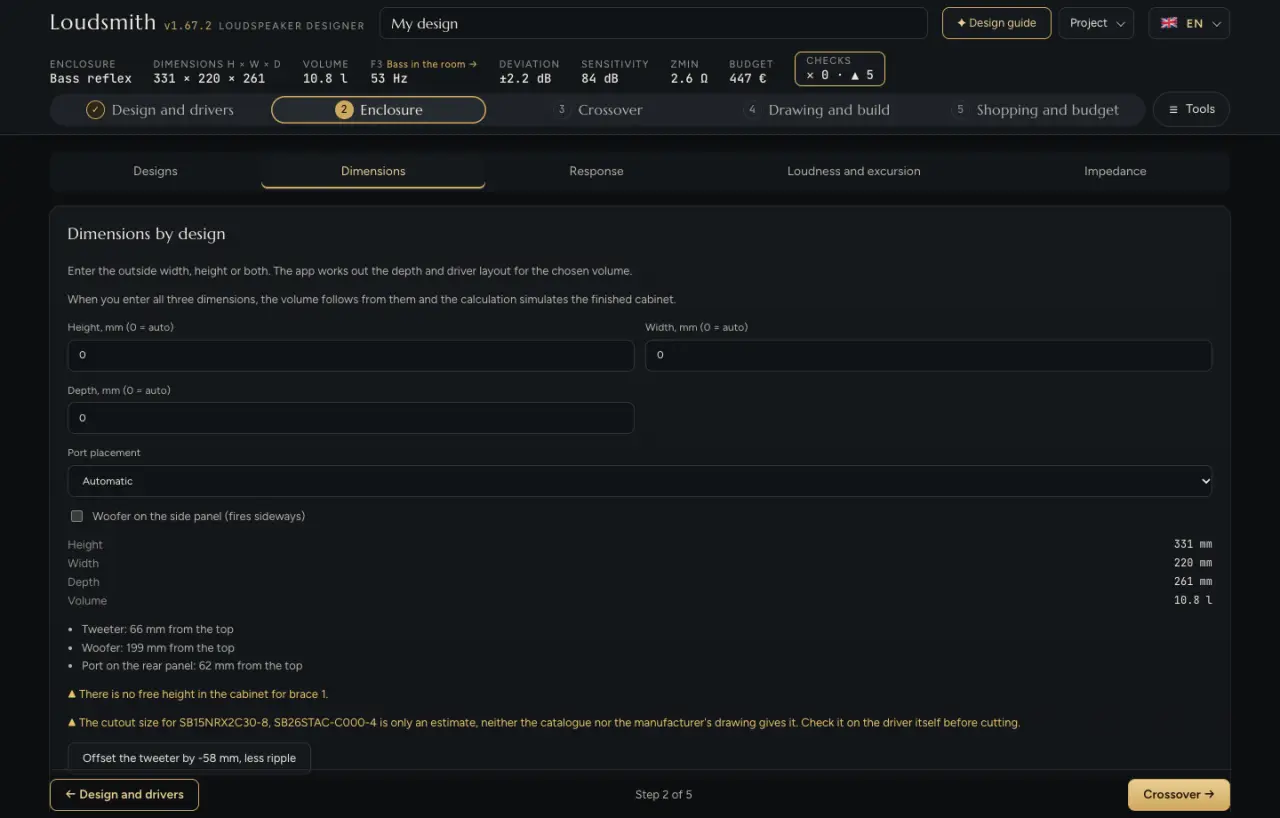
The Dimensions by design card. Enter the external height, width or both, and the app works out the depth for the chosen volume. The same fields are also in the Drawing and build step.
- Height, Width, Depth, mm (0 = auto)
- A fixed dimension is kept, the free ones are calculated. When you enter all three, the volume follows from them and the simulation models the actual cabinet. For bass reflex the port is then recalculated, for a radiator the added weight. If the volume cannot be kept, for example because of the driver’s minimum depth, the app tells you. For ML-TL the height determines the line length; for TQWT the line length is derived from the height. Depth is not entered for open baffle, TQWT and Transmission line.
- Port placement
- Bass reflex and ML-TL: Automatic, rear panel, front baffle, or side panels (one port on each side). Automatic puts the port at the front for ML-TL and for a speaker against the wall or in a corner, otherwise at the rear. If the port does not fit, it is moved to the rear with a warning. It changes the drawing, not the sound.
- Woofer on the side panel (fires sideways)
- The woofer goes on the right side panel and the cabinet comes out narrower and deeper. The simulation treats it as radiating sideways. The app checks whether it fits and whether the magnet hits the opposite wall.
- Radiator placement
- Automatic, rear panel or side wall. It changes only the drawing.
Below the fields is a summary of the dimensions (a lock 🔒 means a dimension entered by hand), a list of driver and port positions in mm from the top of the cabinet, and layout warnings: ✕ means an error (something does not fit), ▲ a warning. If moving the tweeter off-centre would noticeably smooth the response, an Offset the tweeter by X mm button appears. In a pair, the speakers should be mirror images.
Response, Loudness and excursion, Impedance
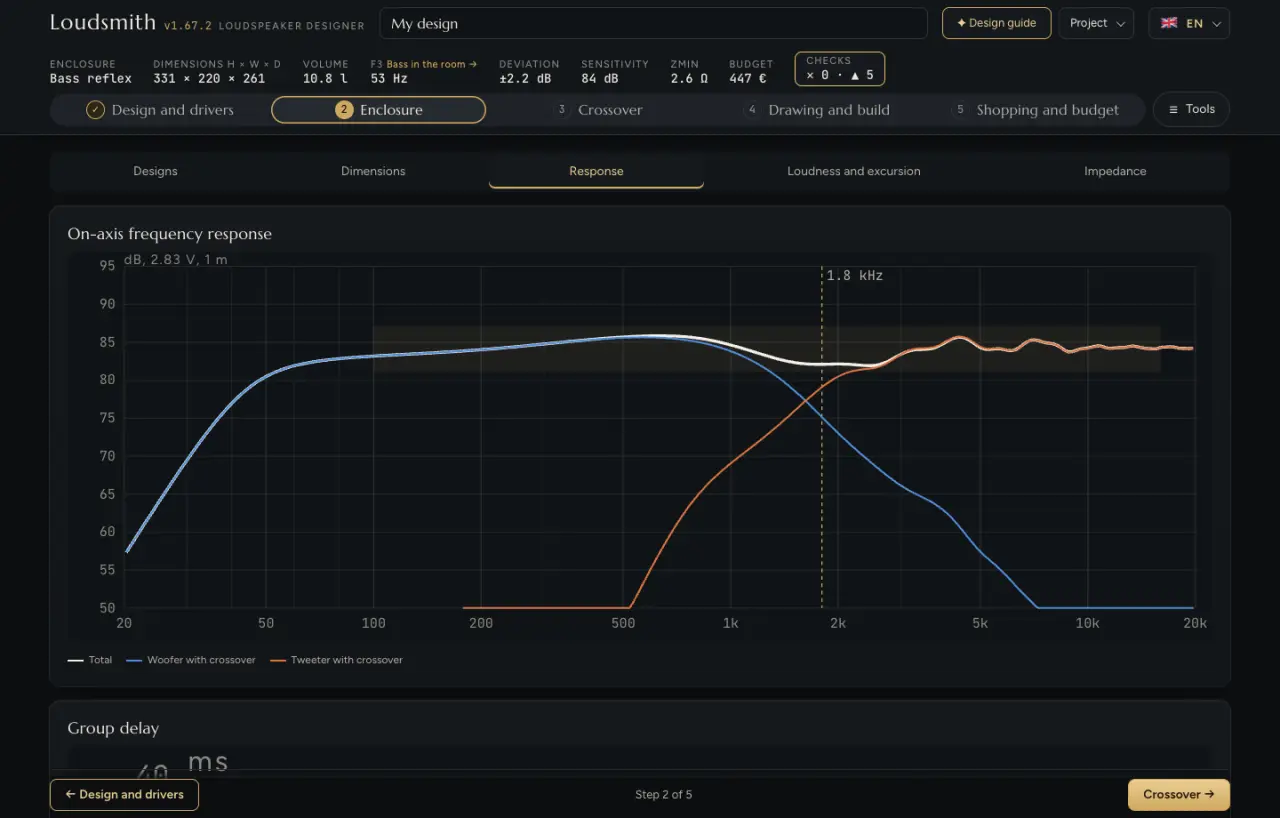
- On-axis frequency response
- Loudness in dB at 2.83 V at 1 m from 20 Hz to 20 kHz. The Total curve is the whole speaker, followed by the woofer, midrange and tweeter with the crossover. The vertical line is the crossover frequency. The light band is the ±3 dB tolerance (±2 dB with strict targets). The more of the Total curve lies within the band, the more even the speaker. Where the curve drops on the left, the bass ends. It includes the cabinet, crossover, baffle diffraction and the effect of placement.
- Group delay
- How much the bass “lags” behind higher notes (15 to 500 Hz). Up to 20 ms is good; above 30 ms the bass is noticeably slower. Bass reflex, radiator and line designs have more than a sealed box.
- Maximum loudness
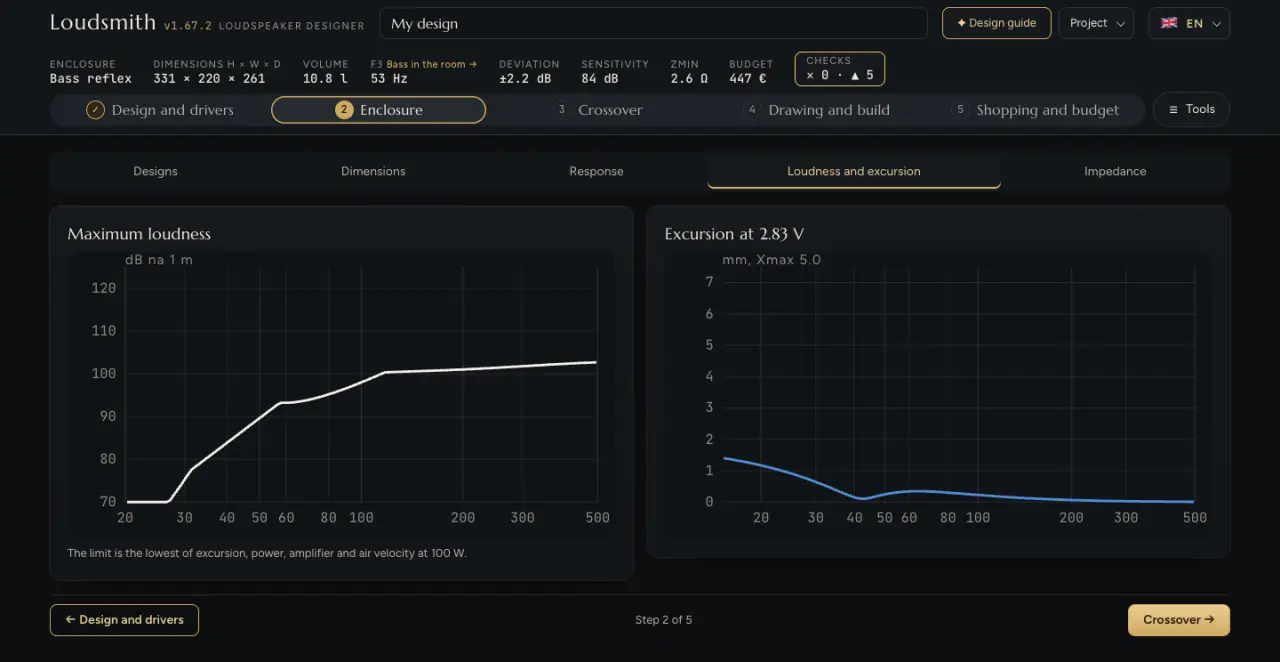
- The highest loudness at 1 m for each frequency (20 to 500 Hz). It is the lowest of the limits: amplifier, woofer power handling, Xmax excursion, air velocity in the port (17 m/s) and radiator excursion. The “Maximum loudness” check tells you which limit applies.
- Excursion at 2.83 V
- Woofer cone displacement in mm at 2.83 V. The axis goes up to 1.5 times Xmax. If the curve already approaches Xmax at this voltage, the speaker will not take much power. With bass reflex and radiator there is a minimum at the tuning and a steep rise below it.
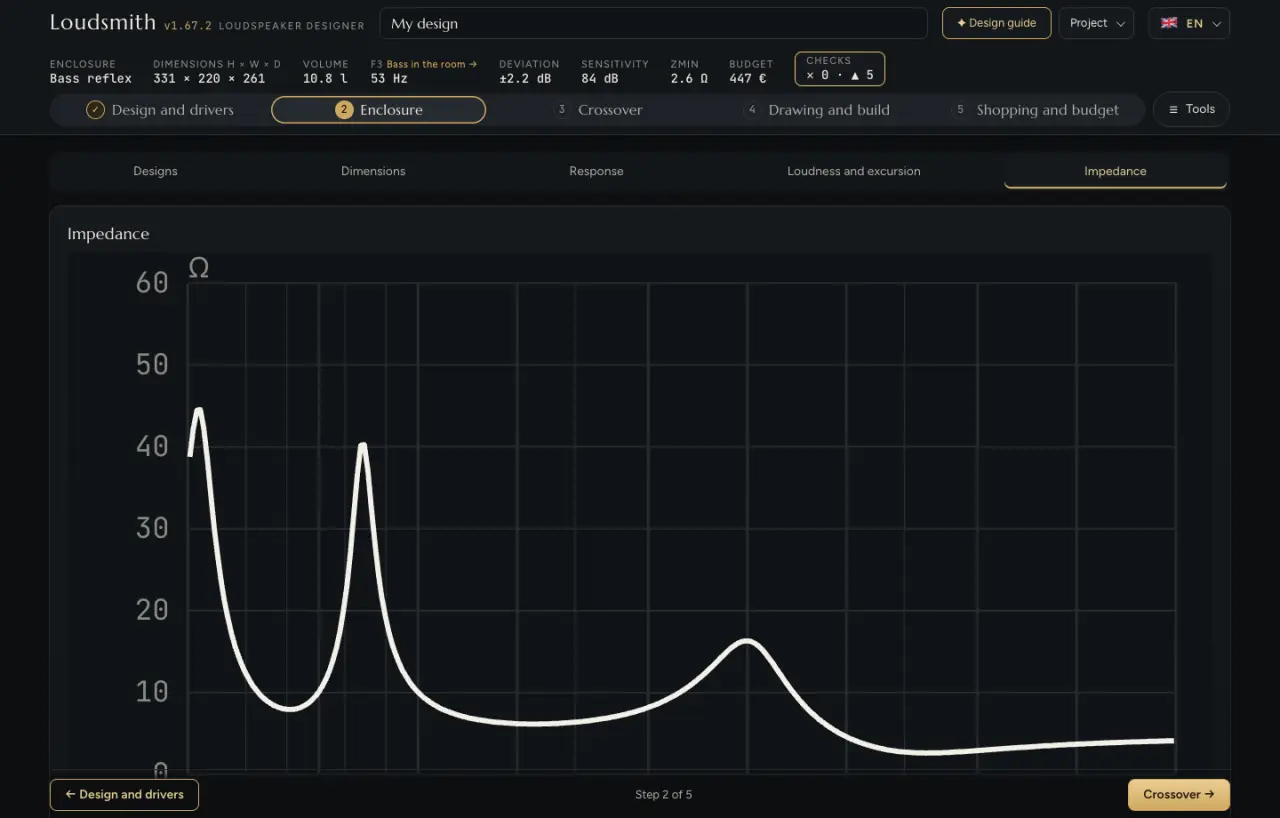
Impedance of the whole speaker with the crossover. A sealed box has one peak, bass reflex and radiator two peaks with a dip at the tuning, line designs several peaks. The lowest value is judged in the “Minimum impedance” check.
Step 3: Crossover
The crossover splits the signal between the drivers and balances their levels. The app designs it by itself from parts the shop actually sells, or you can adjust it by hand. A subwoofer has no passive crossover; the filtering is done by an active amplifier. With a full-range driver there is a Correction instead of a crossover: an R, L, C network that makes up for the bass loss caused by the width of the front baffle (baffle step).
At the top there is always the Crossover card with the Passive, from components / Active with Hypex DSP switch, and the Settings card. The other cards are in the sub-tabs Schematic, Response, Measurements, Notch filter and PCB.
Crossover settings
- Crossover design: Automatic
- The app redesigns the crossover on every change (drivers, cabinet, placement, slope, frequency). It finds the values by optimisation on the model, then snaps them to values that SoundImports sells, and fine-tunes them once more.
- Crossover design: Manual
- Automatic design is off and the values stay even if you change the driver or the cabinet. You change them in the Part values table; a value of 0 removes the part. If the drivers, cabinet or placement have changed in the meantime, the app warns that the values have not been recalculated. Overwriting a value in the table in Automatic mode switches the crossover to Manual. When you go back to Automatic, your manual values are put aside and the Restore my manual values button brings them back.
- Crossover design: Custom circuit
- A free editor in which you can build any circuit (see Custom circuit). The first time you switch to it, it is pre-filled with the current crossover, so the response stays the same.
- Slope
- Only in Automatic mode: 6, 12, 18 or 24 dB per octave, optionally with reversed polarity tweeter or midrange. A steeper crossover has more parts, but the drivers overlap less and the tweeter gets less bass. At 6 dB the drivers overlap over a wide range, so they need headroom and measurement. The slope also determines the lowest safe crossover frequency for the tweeter.
- Crossover frequency (Lower and Upper crossover for 3-way)
- Slider and a number in Hz. The “automatic” label means the app chooses the frequency: it tries several frequencies that the tweeter can handle and the woofer still plays, and picks the best one taking the woofer’s directivity into account. Below the slider is the recommended range (the lower limit based on the tweeter resonance and the slope, the upper limit based on how high the woofer still plays well) and the actual crossover point according to the model. Below the recommended limit the tweeter risks overload; above it the woofer beams or goes into cone break-up. With 3-way the crossover points should be at least 2.5 times apart. The lower crossover also changes the size of the midrange chamber in the cabinet. The Automatic button hands the frequency choice back to the app, and Restore automatic crossover makes a completely new design.
- Reversed polarity tweeter / midrange
- In Manual and Custom circuit modes. Reverses the driver polarity in the simulation, on the schematic and on the PCB (plus from the crossover goes to the driver’s minus).
- Target system level
- The level to which the crossover brings all drivers: the quietest driver minus the baffle step correction.
Schematic and part values
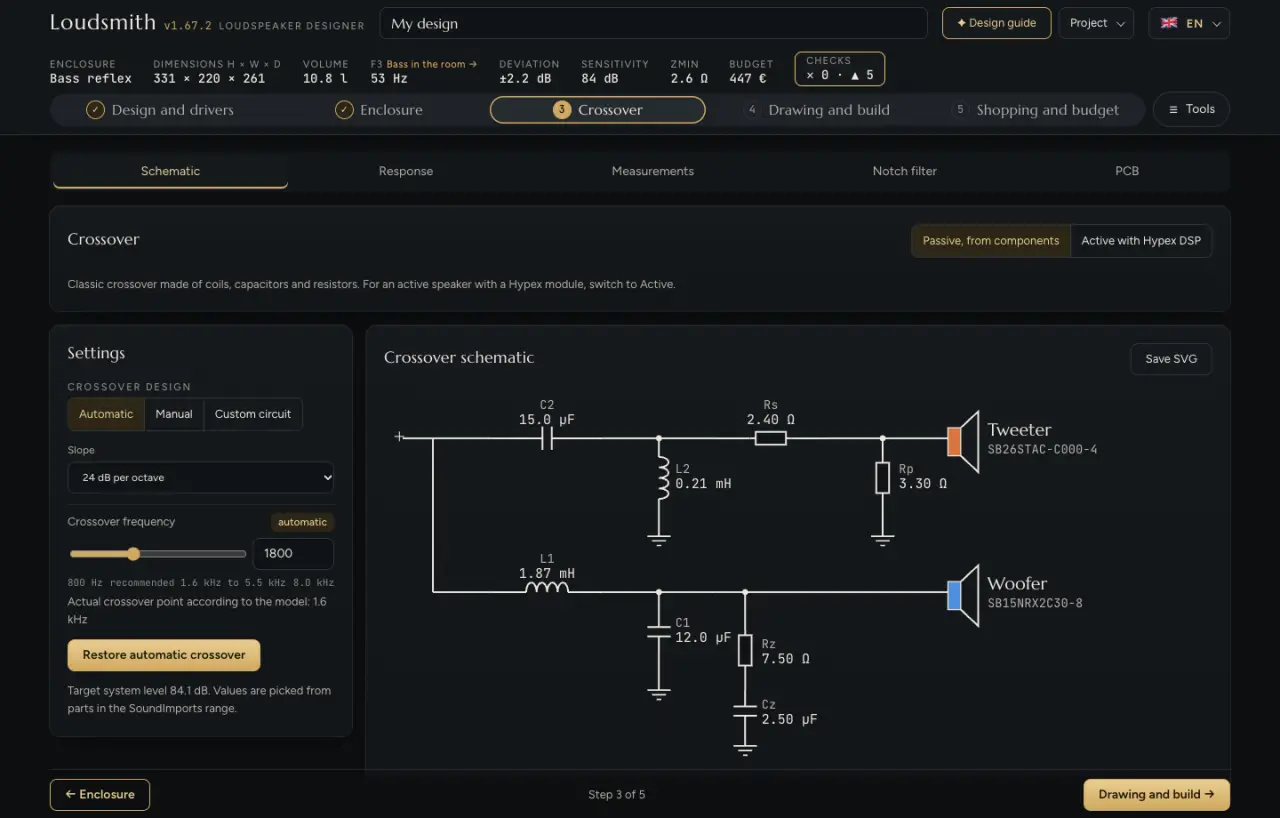
Crossover schematic draws each branch (tweeter, midrange, woofer) from left to right, from the input to the driver. Series parts sit on the line, parts to ground hang below it. Save SVG saves the schematic for printing.
Part values is a table of fields. Each value has a link to a specific part in the shop and its price. “▲ nearest X” means that the nearest value on sale differs by more than 3 %. Parts:
- Tweeter: C2, L2, C3, Rs series, Rp parallel
- C2 and C3 are series capacitors and L2 is a coil in parallel with the driver. Rs with Rp form an attenuator (L-pad) that turns down a tweeter that is too sensitive.
- Midrange: Cm1, Lm1, Cm3, Lm2, Cm2, Lm3, Rms, Rmp
- The high-pass and low-pass filters of the midrange driver and its attenuator.
- Woofer: L1, C1, L3, Rz, Cz, Wr, Wl, Wc
- L1 is the woofer’s main coil. Rz and Cz form a Zobel network that flattens the woofer’s rising impedance. Wr, Wl and Wc are a circuit that suppresses the woofer’s impedance peak.
- Notch R, L, C
- In Manual mode, for each branch, unless it is switched on in the Notch filter card.
- Correction (full-range): Resistor, Coil and Parallel capacitor
- A network that compensates for the baffle step.
In automatic mode only the parts in use are shown. At 24 dB two parts per branch are enough; the third (C3, L3…) is used only at 18 dB. The coil wire resistance (Rdc) is filled in from the catalogue coil. The values feed the simulation, schematic, PCB and shopping list.
Custom circuit
The circuit reads from top to bottom, from the crossover input to the driver. Each branch has stages:
- + In series / + Across the driver
- Adds a stage in series or to ground. The “Wiring” selector switches it later, the ↑ ↓ arrows move it closer to the input or to the driver, × deletes it.
- Part type R / L / C and value
- Changing the type sets a starting value (4 Ω, 1 mH, 10 µF). A value of 0 is ignored.
- Rdc
- Coil wire resistance. An empty field means an estimate based on the catalogue coil.
- + next in line / + parallel branch
- Adds a part in series within the same stage, or a parallel branch.
- Clear circuit
- Empties all branches.
Part names (R1, L1, C1…) are numbered automatically. The simulation, schematic, PCB and shopping list are all calculated directly from this circuit. The Notch filter is not used in this mode.
Response and impedance
- Resulting response
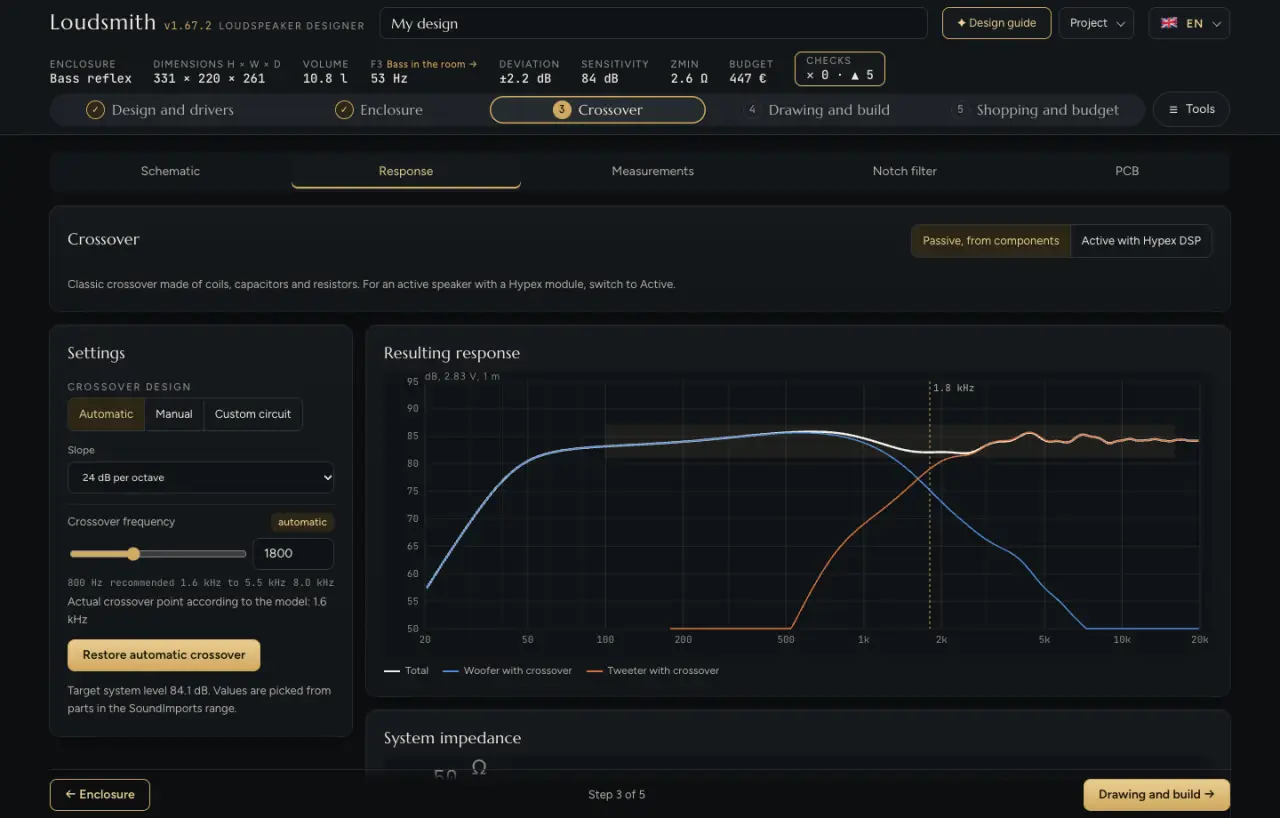
- On-axis response with the crossover, front baffle and placement, at 2.83 V at 1 m. The Total curve is the whole speaker, followed by the branches for the individual drivers. The grey band is the ±3 dB tolerance; the vertical marks are the crossover frequencies. The Total curve should stay within the band. A dip at the crossover means wrong polarity or phase. With loaded measurements you see Simulation without measurement and With loaded measurement, and with a measurement of the whole speaker also a red Speaker measurement curve.
- System impedance
- Impedance of the whole speaker with the minimum marked. The minimum should not fall below roughly 0.8 times the nominal impedance (at most 3.2 Ω), and at least 6 Ω for a valve (tube) amplifier.
Measurements
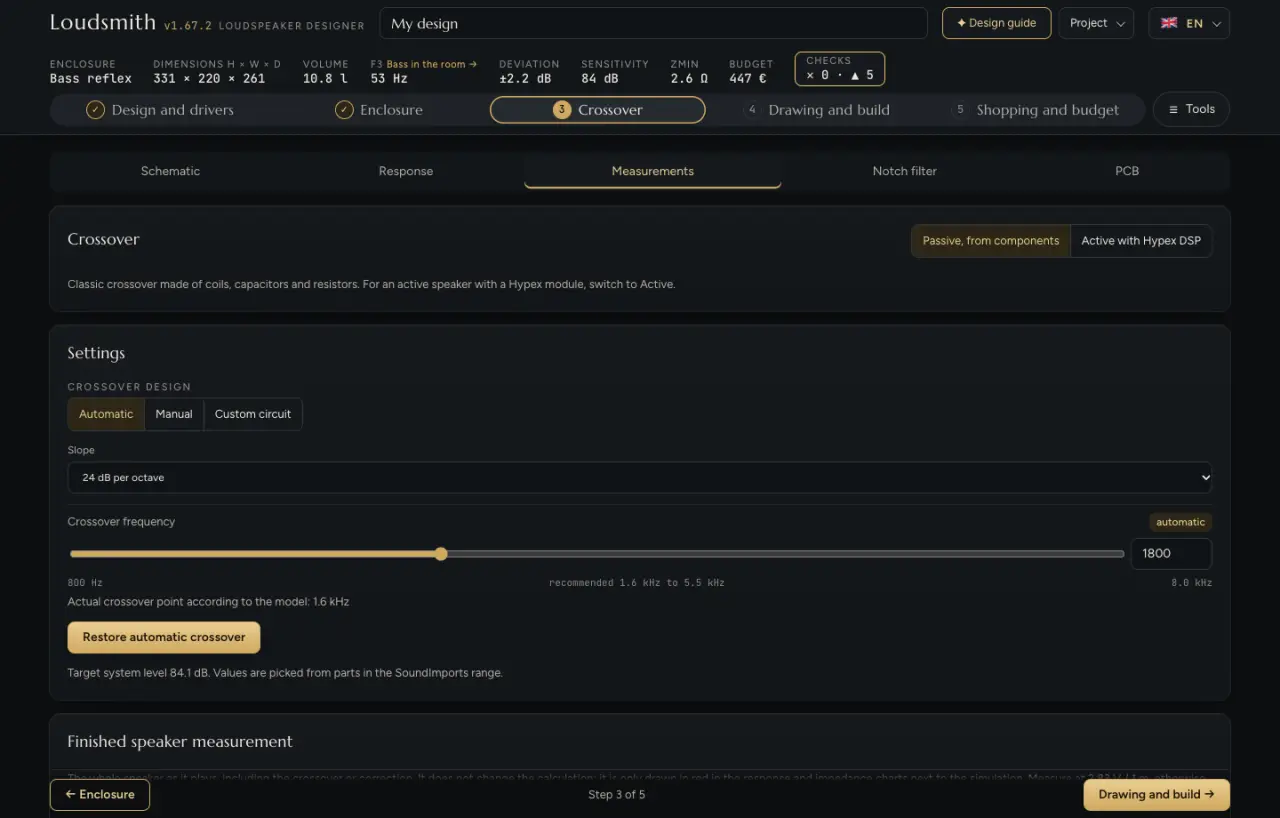
- Driver measurements: Woofer, Midrange, Tweeter, FRD and ZMA
- Load the frequency response (FRD) and impedance (ZMA) of a driver, ideally measured in the cabinet. The measurement replaces the model in the crossover design, in the graphs and in the checks. The file is text with lines of “frequency value [phase]” and must have at least 8 lines. If the FRD has no phase, minimum phase is calculated. The files stay on your device and are included in the project export, not in the link.
- Woofer FRD and ZMA are outside the cabinet
- Turn this on if the woofer measurement is from a datasheet or was taken outside the cabinet. The bass below 150 Hz is then calculated by the model with the cabinet, and above 400 Hz the loaded curve is used.
- Finished speaker measurement: Whole speaker, FRD and ZMA
- The whole speaker as it plays, crossover included. It does not change the calculation: it is shown in red next to the simulation, and the Measurement vs. design card evaluates it. Measure on the tweeter axis at 1 m.
- Measurement vs. design
- Compares the measured speaker with the design it was built from and proposes fixes: a new L-pad when the treble plays louder or quieter, reversed polarity for a dip around the crossover point, a notch for a narrow peak, and the port length when the ZMA shows a different tuning. The comparison is relative, so an uncalibrated microphone does not matter. The button next to a fix writes it into the crossover (switching it to manual values) and lists what changed on the shopping list and the PCB. Revert the fix reverts it. After a change, the graph shows the Estimate after changes: the measurement plus what the change does in the model. When you rebuild the speaker and measure it again, load the new measurement or press I rebuilt the speaker and measured again. The FRD is evaluated from 300 Hz, the bass from the ZMA. Measuring each driver in the cabinet gives the most accurate fixes.
- Delete measurements
- Returns the design to the model.
How to measure a driver and a speaker with a microphone directly in your browser is shown by the Speaker measurement tool on our website.
Notch filter
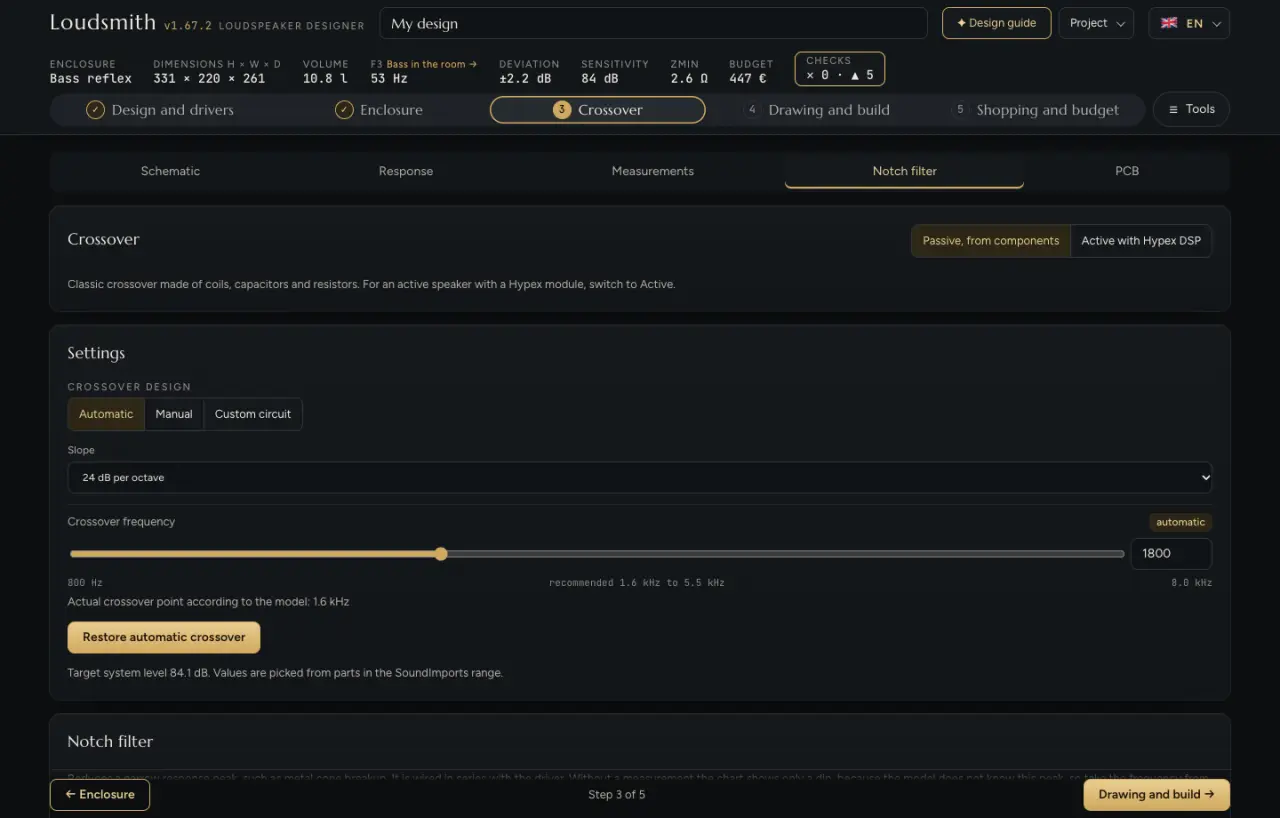
A notch attenuates a narrow peak in the response, for example the break-up of a metal cone. It is connected in series with the driver. The model does not know about this peak, so take the frequency from a measurement (FRD) or the datasheet. For each branch (woofer, midrange, tweeter):
- Checkbox
- Turns on the notch for this branch.
- Frequency, Hz
- The centre of the peak you want to attenuate.
- Depth, dB
- How much it attenuates it (0.5 to 20 dB).
- Width, Q
- A higher Q means a narrower notch.
From these values and the driver impedance the app calculates R, L and C (in parallel, in series with the driver) and picks values that are on sale. If the notch then lands somewhere else, it warns you. The parts go into the schematic, simulation, PCB and shopping list. The automatic crossover is designed without the notch, and the notch is added afterwards.
PCB
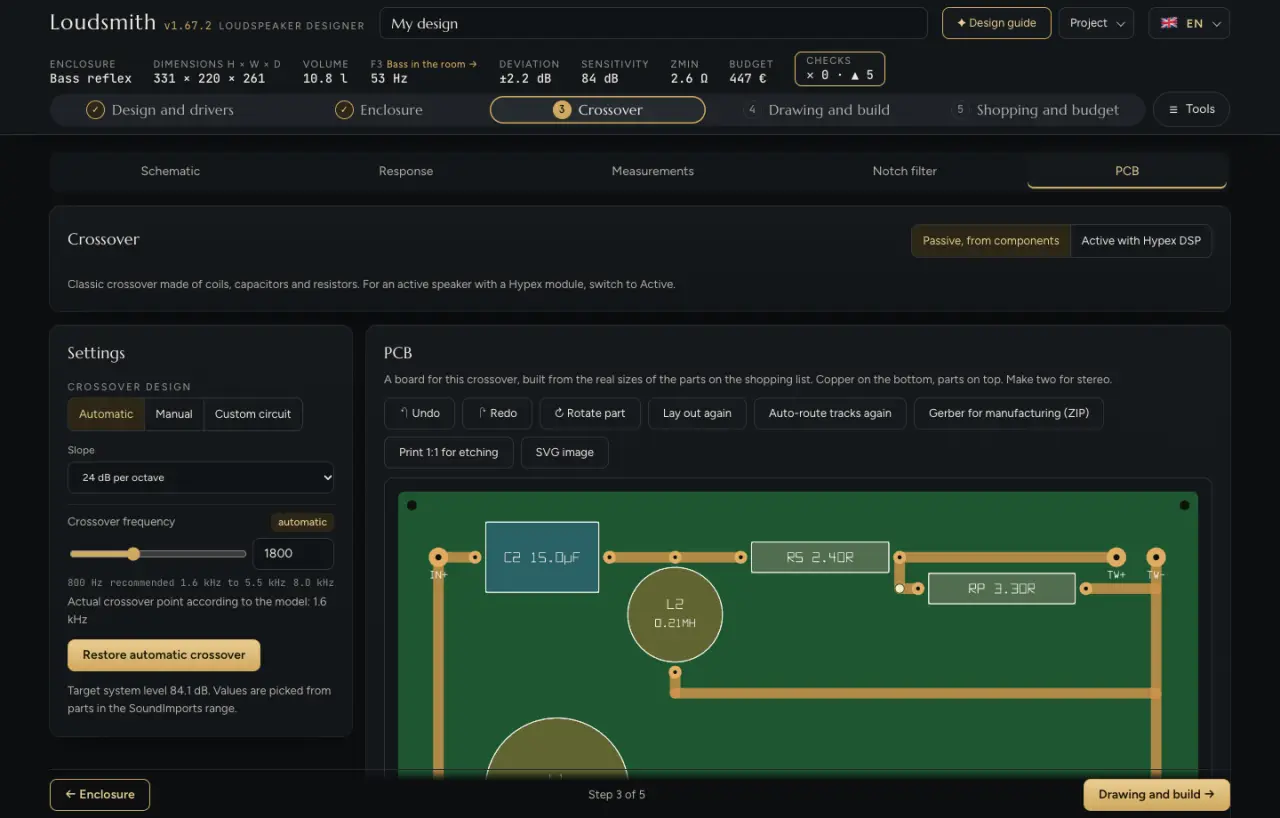
The editor designs a single-sided printed circuit board (PCB) for this crossover using the real part sizes from the shopping list. Parts are on top, copper on the bottom. For stereo, make two boards. It also works for a custom circuit. All changes are saved in the project.
How the board is laid out: one “ladder” for each driver. The input runs along the left edge, series parts lie on the branch line and parts to ground hang below it. Each branch has its own ground strip, and the strips meet on the right at the driver terminals. Tracks are 3.5 mm wide by default and gaps are at least 1 mm. In the corners there are Ø 3.2 mm mounting holes. Air-core coils close to each other would interact, so the smaller of a pair is stood on edge automatically.
- ↶ Undo / ↷ Redo
- Undoes or redoes a step, up to 100 steps, while the page is open. Keys Ctrl+Z and Ctrl+Shift+Z.
- ↻ Rotate part
- Rotates the selected part by 90°. Double-clicking a part or pressing R does the same.
- Lay out again
- Clears all moves, rotations and manual tracks. Custom part sizes are kept.
- Auto-route tracks again
- Clears only manually routed tracks and jumpers.
- Gerber for manufacturing (ZIP)
- Files for the board maker: copper, mask, silkscreen, outline and drilling. Just upload the ZIP with your order at a PCB manufacturer.
- Print 1:1 for etching
- Black copper on white at actual size. Print at 100 % without fit to page and check the size with a ruler. Don’t print mirrored; when you iron the toner onto the copper, the pattern flips the right way by itself. The copper text (terminals, parts) is mirrored on the printout and reads correctly from the copper side. On iPad and iPhone a PDF is downloaded instead, print it via Share → Print. The white dots are the hole centres.
- SVG image
- A preview of the board in real millimetres.
Working with the mouse: drag to move parts and terminals (0.5 mm steps). A move is stored as an offset from the automatic position, so when a part changes, its neighbours shift and your moves are kept. You change a track by dragging the white point at a corner: a track always stays horizontal and vertical, with right-angle bends. You can grab any line anywhere, including the ground and input rails, and drag it sideways: its corners move with it and a short jog is added to the pad. Double-click a line to add a corner, double-click a corner to remove it.
Part panel (click a part) shows the name, value, shop link and size. “The size is an estimate” means the shop does not list it, for example for resistors. In that case check and correct it.
- Link to a part on soundimports.eu + Load
- Paste a link to a different part. The app loads its size, adjusts the footprint and the rest of the board rearranges itself. If the part has a different value from the design or is a different type, the app warns you. It changes only the board, not the shopping list or the calculation.
- Shape and dimensions
- Cylinder lying, block (ceramic resistor), coil or cylinder standing, with diameter, length, width and height in mm. The dimensions set the outline and the pad spacing: for a lying cylinder and a block it is the length + 7 mm.
- Wire or lead mm
- Lead thickness. It sets the hole diameter (wire + 0.5 mm) and the pad.
- Stand on edge / Lay flat
- Coils only. A standing coil takes up less room and couples less with its neighbour.
- Original place / Back to the shop part
- Cancels the part’s move or its custom size.
Track panel (click a line):
- Width of the whole track
- 2 to 10 mm; each width shows an estimate of the current the track can carry (35 µm copper, 10 °C rise): 3.5 mm about 5.9 A, 6 mm about 8.8 A. It applies to the whole track, i.e. all lines of the same node. The ground and input strips can also be made wider.
- Make it a jumper
- The segment becomes a wire on the parts side (shown in blue on the board). Its two pads have the same mark, P1 and P1, P2 and P2… There is no copper under the jumper, so another track can pass there.
- Add a corner in the middle / Back to automatic routing
- Adds a bend, or returns the track to automatic routing.
Board check runs after every change. A green tick means that no tracks cross, gaps are at least 1 mm and parts do not overlap. Problems are shown in red:
- A track crosses another track. A blue “P” mark appears at the crossing and a Bridge with a jumper button below the board. Clicking it splits the segment, moves the jumper pads to a safe distance and turns the middle into a wire.
- Short between tracks and Tracks too close: copper of different tracks touches or is closer than 1 mm.
- A track doesn’t reach its pad: the track is not continuous.
- X and Y overlap: the part bodies intrude into each other.
- Coils are close: move them apart or stand one on edge.
- Track next to a mounting hole: copper is closer than 1 mm to a screw hole.
The board silkscreen shows the part names and values, the IN+ and IN− terminals and the driver outputs: VYS±, STR±, BAS± (TW, MID, WF in other languages).
Active crossover with Hypex DSP
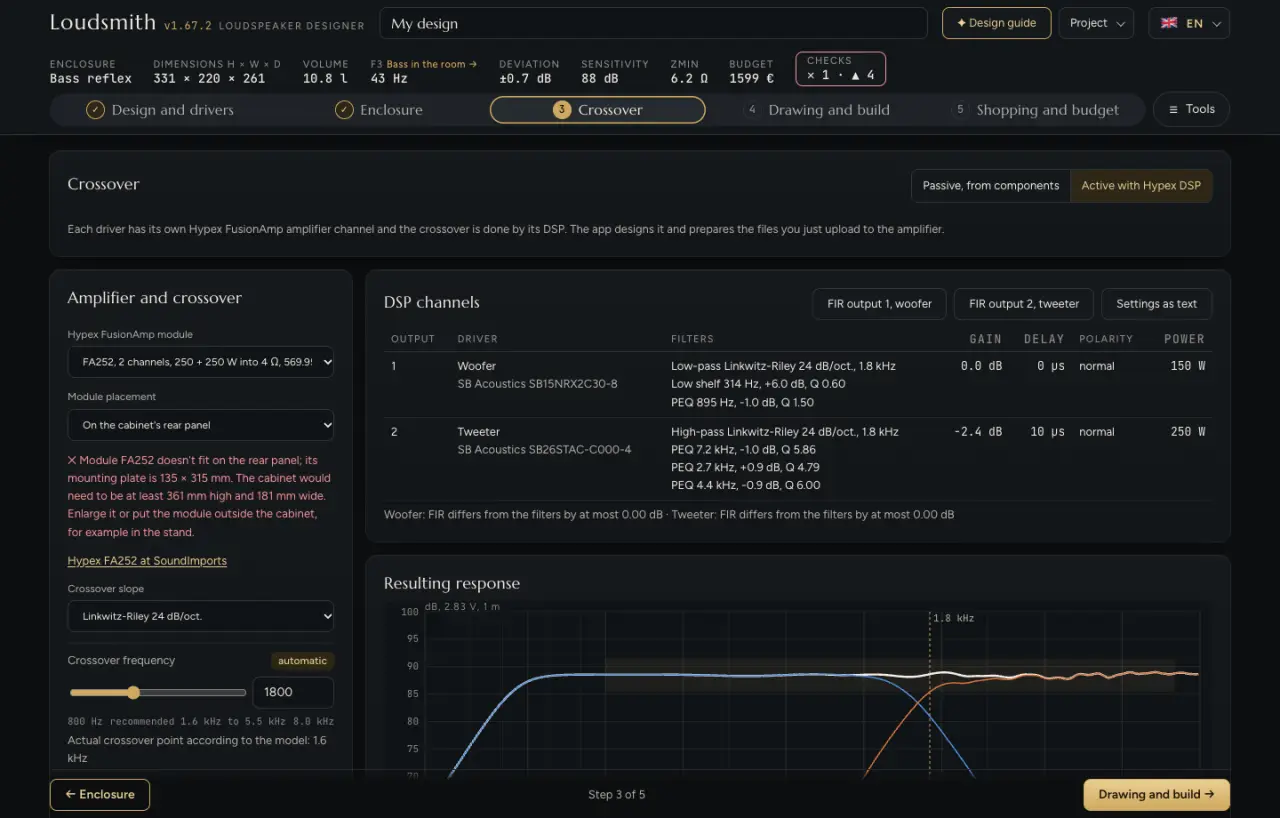
The Active with Hypex DSP switch designs filters for a Hypex FusionAmp amplifier instead of coils and capacitors. Each driver has its own channel and the processor does the crossover. The sub-tabs are not shown here.
- Hypex FusionAmp module
- Eight modules with 1 to 3 channels and 125 to 500 W of power, with the shop price. It determines the power of the woofer channel (and so the maximum loudness), the size of the mounting plate and the box inside the cabinet, and the price in the shopping list. If the module has too few channels, the app tells you.
- Module placement
- On the cabinet's rear panel: the module needs an airtight box behind it. Its volume is added to the cabinet so the net volume stays the same, the port moves to the front and the radiator to the side, and the box parts and the cutout are added to the cut list. Outside the cabinet (for example in the stand): the cabinet stays unchanged.
- Crossover slope
- Linkwitz-Riley 12, 24 or 48 dB/oct., or Butterworth 12, 18 or 24 dB/oct. The default is LR 24.
- Crossover frequency
- As for the passive crossover. The “automatic” label means the frequency comes from the automatic passive design.
- Baffle step correction with a shelf filter
- The woofer gets a filter that lifts the bass by 0 to 6 dB and compensates for the loss caused by the width of the front baffle.
- EQ for a flat response
- Up to 8 parametric filters: they cut peaks (by up to 10 dB) and gently lift broad dips (by up to 3 dB).
- Other module price per piece
- If you buy the module elsewhere, enter its price. 0 means the shop price.
The app sets the channel gains to match the quietest driver and, at each crossover point, finds the polarity and delay for the flattest sum. The DSP channels table shows the filters, gain, delay, polarity and power for each output. The FIR output N buttons save a FIR filter file for each channel, and Settings as text saves everything for manual entry. The Uploading to Hypex card has 6-step instructions: Hypex Filter Design, a new project for FusionAmp, Output FIR, loading the files, empty biquads and Load filter to DSP. Do the first power-up at low volume.
Step 4: Drawing and build
Here you set the look and construction of the cabinet: finish, material, board thicknesses, rounding, driver positions and braces. You get a workshop drawing, a cut list and build steps. Sub-tabs: Preview and material, Drawing, Cut list, Build steps and Driver images.
Finish, colours, veneer grain direction, material and photos change only the appearance. Board thicknesses, rounding, driver positions and braces trigger a new calculation, so the dimensions, response and checks may change.
Preview and material
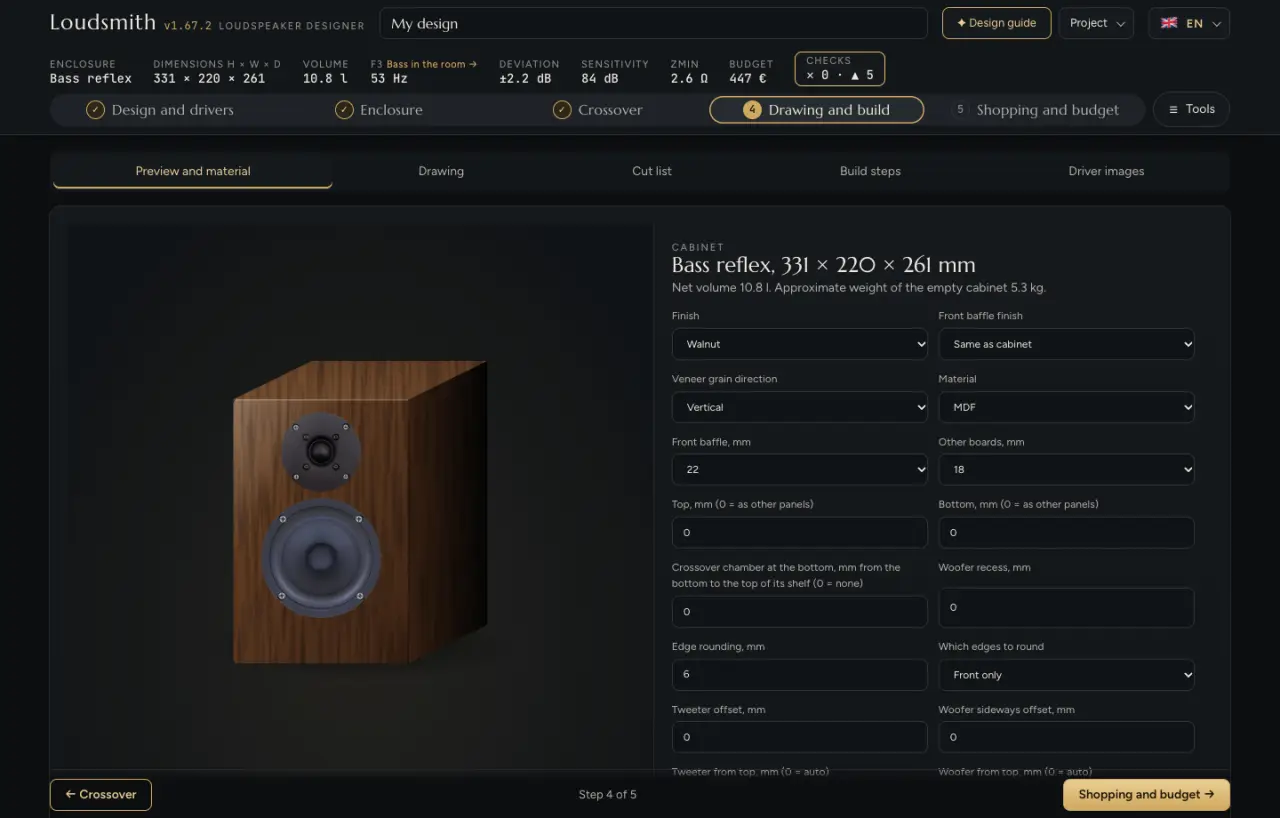
At the top are the cabinet type, external dimensions, net volume and approximate weight of the empty cabinet (boards × material density, without drivers). The preview is an image. Rotate in 3D loads the model: drag to rotate it, use the scroll wheel to zoom, and the Front, Side, Rear and Top buttons turn it to those views. In 3D you can see the rounding, holes, ports, radiators, driver photos and screws.
- Finish / Cabinet colour
- Walnut, Oak, Black piano lacquer, White lacquer, Matte lacquer, Gloss lacquer, Raw MDF or Birch plywood. With matte and gloss lacquer you choose a colour. It changes the look and the description on the drawing, not the price or the sound.
- Front baffle finish and colour
- The front baffle can have a different finish from the cabinet.
- Veneer grain direction
- Vertical or horizontal, only for finishes with a wood grain.
- Material
- MDF, Birch plywood, HDF, Solid wood, Chipboard or Acrylic. It changes only the weight estimate, the material note and the description on the drawing. It does not change the sound, dimensions or budget: the board price is entered in the Shopping step.
- Front baffle, mm / Other boards, mm
- Thickness of the front baffle (12 to 44 mm) and of the other boards (10 to 25 mm). The net volume is kept, so thicker boards increase the external dimensions. It changes the cut list, drawing and weight. Frame braces have the thickness of the other boards.
- Top, mm and Bottom, mm (0 = as other panels)
- A different thickness for the top or bottom board. In the cut list they are then split into two rows.
- Crossover chamber at the bottom, mm (0 = none)
- Adds a shelf above the bottom and creates a separate chamber for the crossover. The chamber volume is not counted in the woofer volume, so the cabinet grows. “Crossover chamber shelf” is added to the cut list.
- Woofer / port recess, mm and Port recess diameter
- The routing depth for the flange so that the driver or port does not protrude. It is shown on the drawing, in the hole table and in the cut list. A recess deeper than the front baffle is an error.
- Edge rounding, mm and Which edges to round
- Rounding radius (0 to 40 mm) and the edges: front only, front and back, front vertical edges, vertical edges or all edges. Rounding also affects the sound: it reduces reflections from the baffle edges in the simulation, and therefore the “On-axis flatness” check. The options with vertical edges have about 60 % of the effect. Rounding larger than the front baffle thickness would cut into the joint with the side panel.
- Tweeter / woofer sideways offset, mm
- Moves the driver off the cabinet’s centre line (+ to the right). An asymmetric tweeter smooths out edge reflections. It changes the response, drawing and 3D view. A pair should be built as mirror images.
- Tweeter, Midrange, Woofer and Port from top, mm (0 = auto)
- Manual height of the driver or port centre. At 0 the app itself places the drivers where the edge ripple is smallest, and in a tall floorstander it tries to get the tweeter about 95 cm above the floor. With manual positions it warns about overlapping drivers or drivers extending past the board.
- Port sideways offset / Port from the front / Spacing of two ports
- Position of the port on the board or in the side panel, and the spacing of two ports.
- Tweeter / Midrange in a separate box
- The driver gets its own small box on top of the bass cabinet. Enter the box dimensions (width, height, depth, rear set-back) or leave them at 0 and the app calculates them. The box parts are added to the drawing and the cut list. The “Tweeter on top, midrange below it” option swaps the order of the boxes.
- Turn woofer / midrange / tweeter by 90°
- Only for a driver with a flat-cut or oval basket. Turned, it takes up less width.
- Woofer on top, tweeter below
- In a 2-way, reverses the order of the drivers on the front baffle.
- Height, Width, Depth, mm (0 = auto)
- Fixed external dimensions, the same as in the Enclosure step. The free dimensions are recalculated to keep the volume.
Below the controls are warnings (▲ warning, ✕ error), for example when a driver does not fit the width or stacked drivers need a taller cabinet.
Drawing and braces
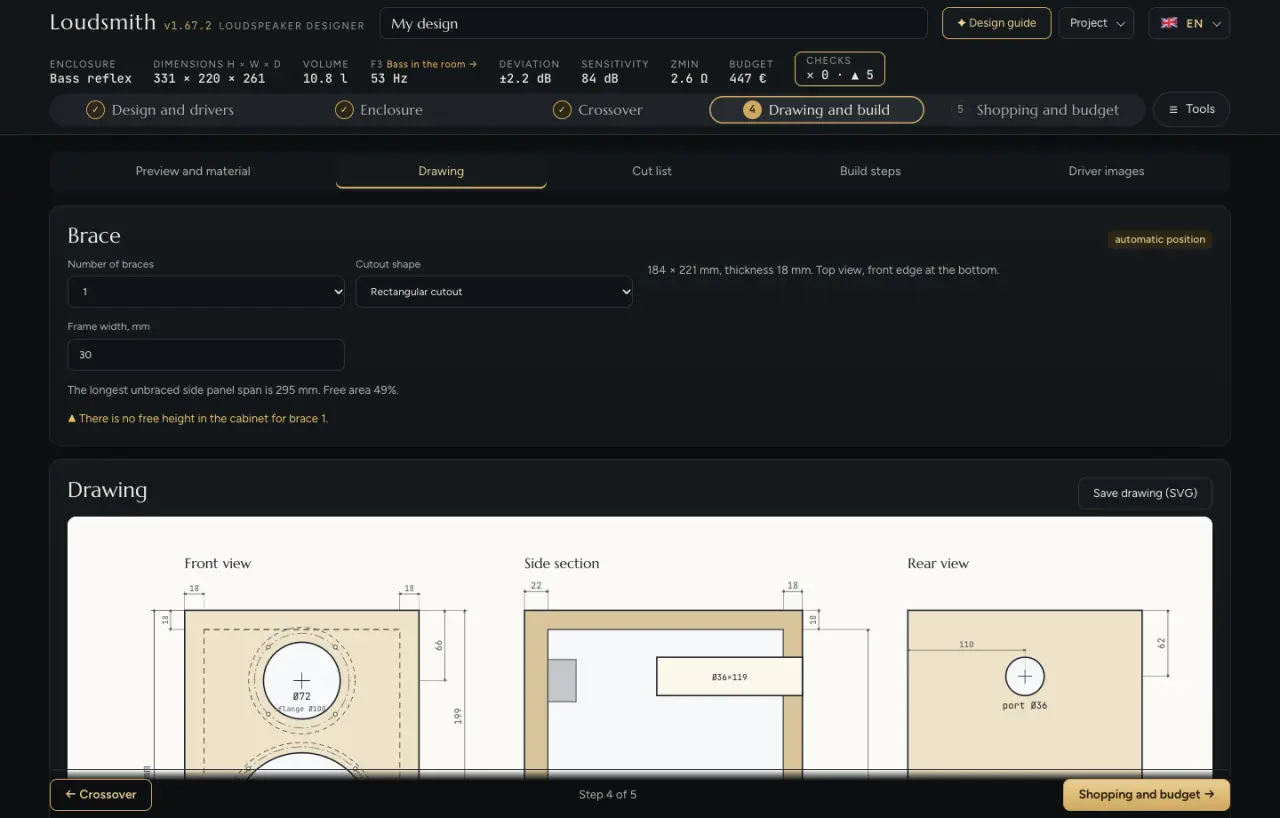
The Brace card (not for open baffle, TL and TQWT, which have line partitions instead):
- Number of braces
- 0 to 4. By default a floorstanding cabinet has 2 and the others 1.
- Cutout shape
- Rectangular cutout (frame with an opening), Two rectangles, Round holes, Open frame, free at rear (a rear port, radiator or terminals can pass through) or Bar from side to side (a single bar between the side panels; the least wood, but it does not stiffen the front and back boards). In an ML-TL the rectangular cutout is replaced by a bar so the frame does not narrow the line.
- Frame width / Bar size, mm
- 15 to 100 mm. A wider frame means a smaller opening and less free area.
- Brace N, from cabinet top / from front baffle
- Manual brace position. The app reports if it collides with a driver, port, radiator or terminals. Automatic position cancels the manual positions.
Below that are the longest unbraced span of the side panel and the free area. Below 35 % the brace may obstruct the airflow. Braces do not change the net volume; the cabinet has a flat allowance of 4 to 6 % for them.
The Drawing card contains a front view with holes, flanges, estimated screw holes and dimensions; a side section with boards, braces, port and line; a rear view with terminals, port and radiator; and a brace detail. In the corner is a title block: enclosure, drivers, volume, material, finish, rounding and the predicted F3 and Zmin. Save drawing (SVG) saves it for printing. The Holes in the front baffle table gives, for each driver, the centre from the top and from the left edge, the through hole, the flange, the recess, the estimated screws and the distances to the edges and neighbours. The screw holes are an estimate: hold the actual driver against the baffle before drilling.
Cut list and build steps
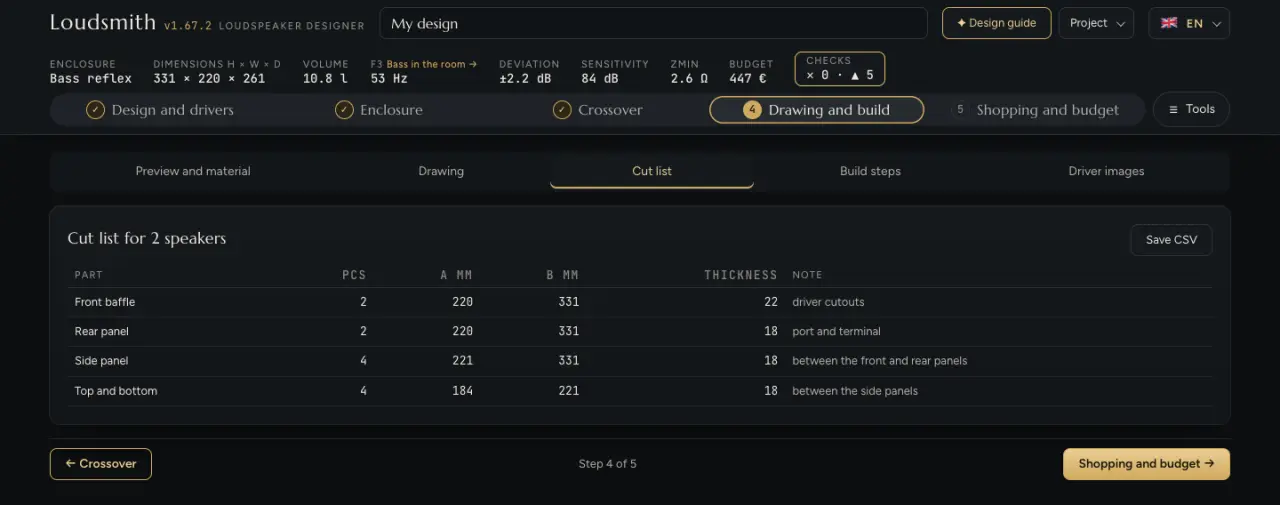
Cut list for N speakers (N is the number of speakers from the Shopping step). Each board has a name, quantity, blank size A × B, thickness and a note on where it goes and what holes it has. The side panels sit between the front and back boards, the top and bottom between the side panels. Save CSV saves the list for Excel or for cutting on a panel saw. The board area in the budget and the cabinet weight are calculated from this list.
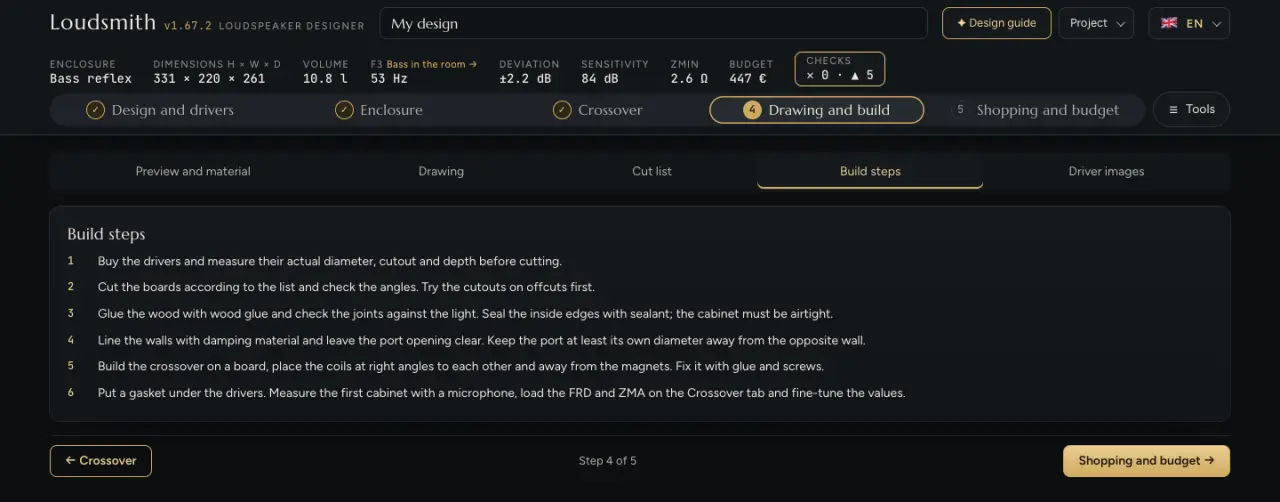
Build steps are numbered steps based on your design: checking the drivers before cutting, cutting, gluing and sealing, damping according to the cabinet type, midrange chamber, assembling the crossover (coils at right angles to each other and away from magnets) and finally measuring the first speaker and loading the FRD and ZMA into the Crossover step.
Driver images
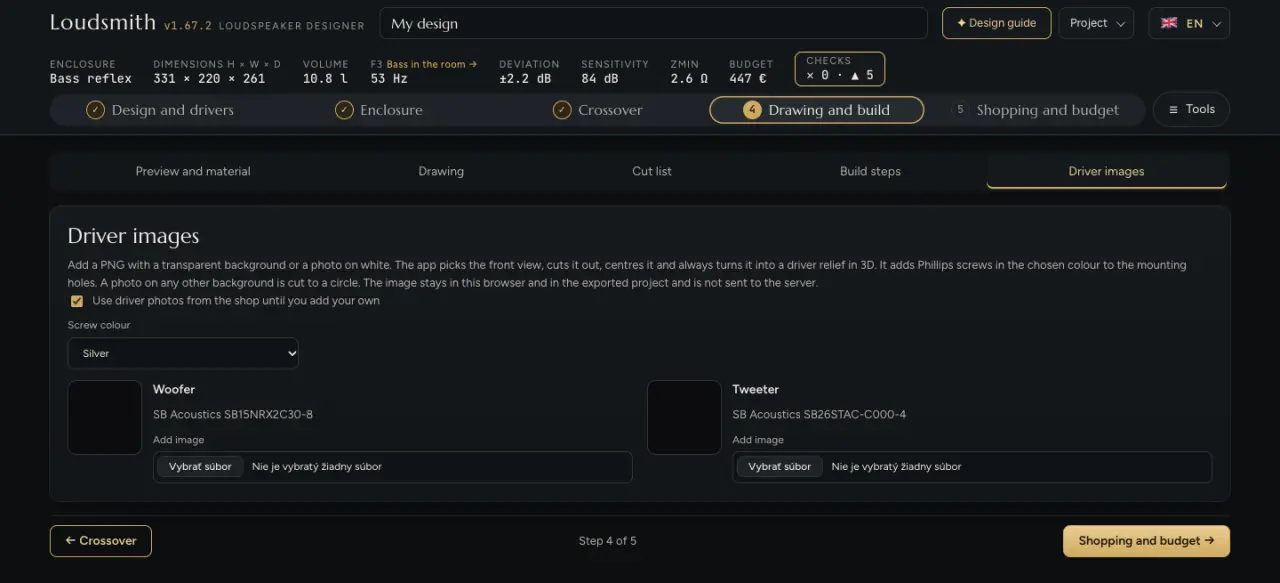
- Use driver photos from the shop until you add your own
- A driver without its own photo gets the front-view photo from the shop. Compression and horn drivers do not get one.
- Screw colour
- Silver or black, in 3D and in the image.
- Add image
- A PNG with a transparent background or a photo on white (up to 30 MB, at most 12 photos per project). The app crops the front view, removes the background, finds the mounting holes and turns the image into a relief in 3D. The image stays in the browser and in the exported project; it is not sent to a server.
- Size and Driver centre
- The image scale on the driver and the shape of the relief centre (with a dome or flat).
Photos belong to the driver, not to the design, so they are kept even after “New design”. They do not change the drawing or the cut list.
Step 5: Shopping and budget
A list of everything you need to buy, with prices from the SoundImports shop and an estimate of the total cost. At the top there is always the Total budget summary. Sub-tabs: Shopping list, Order and Settings.
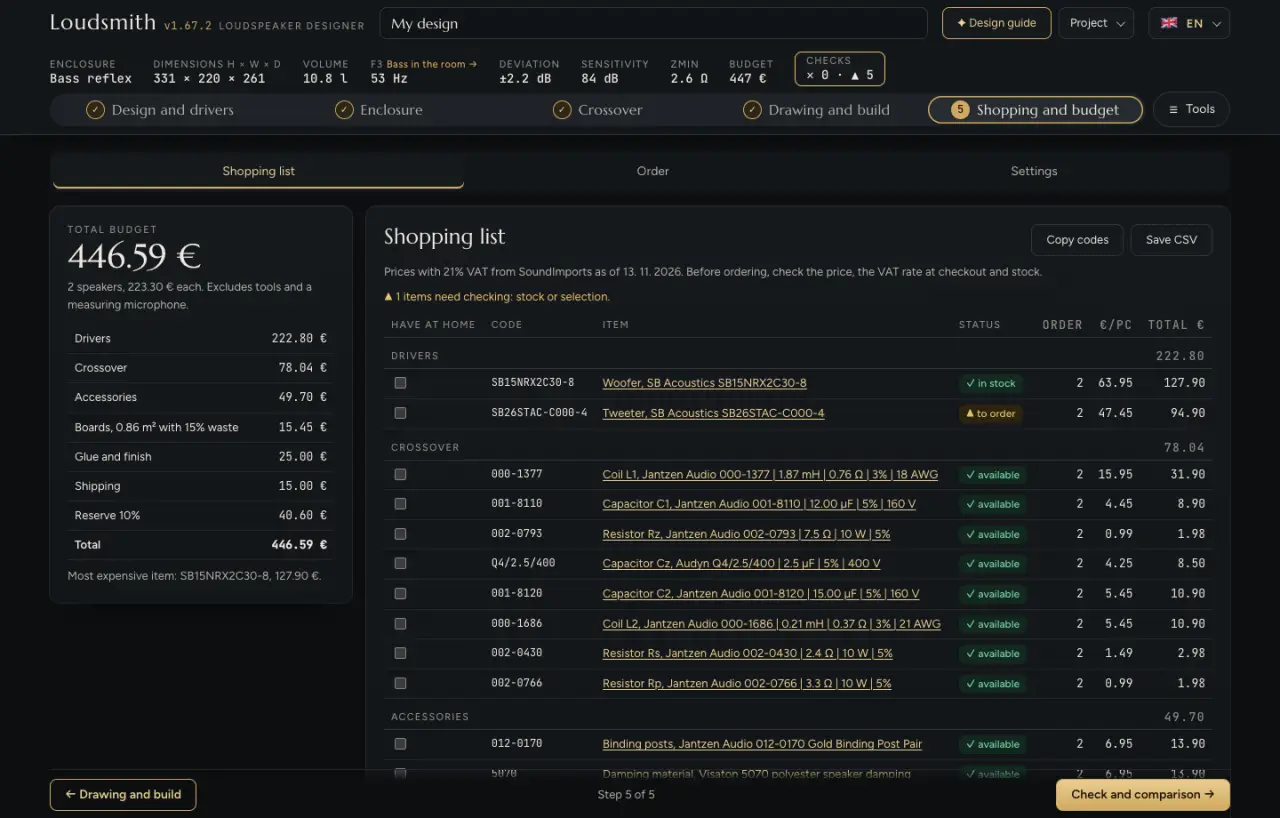
Total budget shows the total, the price per speaker, a bar against your limit, and rows: Drivers, Crossover, Accessories (only what you don’t have at home), Boards (area of all parts × number of speakers × 1.15 for waste × price per m²), Glue and finish, Shipping and Reserve in %.
Shopping list
- Have at home
- Tick the items you already have. For items with several pieces you enter how many you have. These pieces are left out of the order, the totals and the budget.
- Item and status
- Name with a link to the shop, and status: ✓ in stock, ▲ only a few pieces, on order or needs to be chosen manually, ○ check in the shop. For a crossover part with a different value from the design, it shows “▲ designed X”.
- Copy codes
- Copies lines of “quantity × CODE link” for quick pasting into the basket.
- Save CSV
- The whole list with prices and budget rows for Excel.
The list contains the drivers (× number of woofers and speakers), crossover parts (or the Hypex module for an active crossover), terminals, damping material and a port from the catalogue with a note on how much to trim it. If the shop has no suitable port, the row stays without a price as “choose manually”.
Order
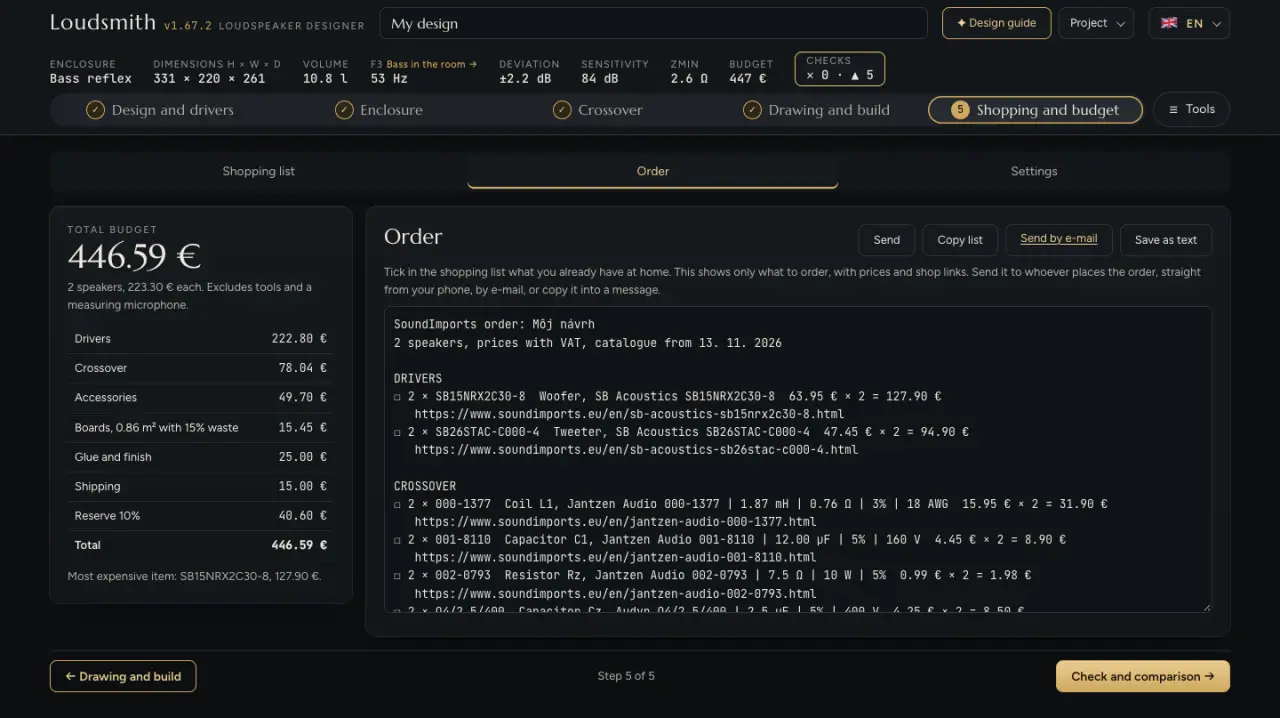
A ready-made order text: only what you need to buy, with prices and links, and separately a list of things you have at home. Send (on a phone), Copy list, Send by e-mail (opens an e-mail; you add the recipient yourself) and Save as text. The app does not order anything by itself.
Budget settings
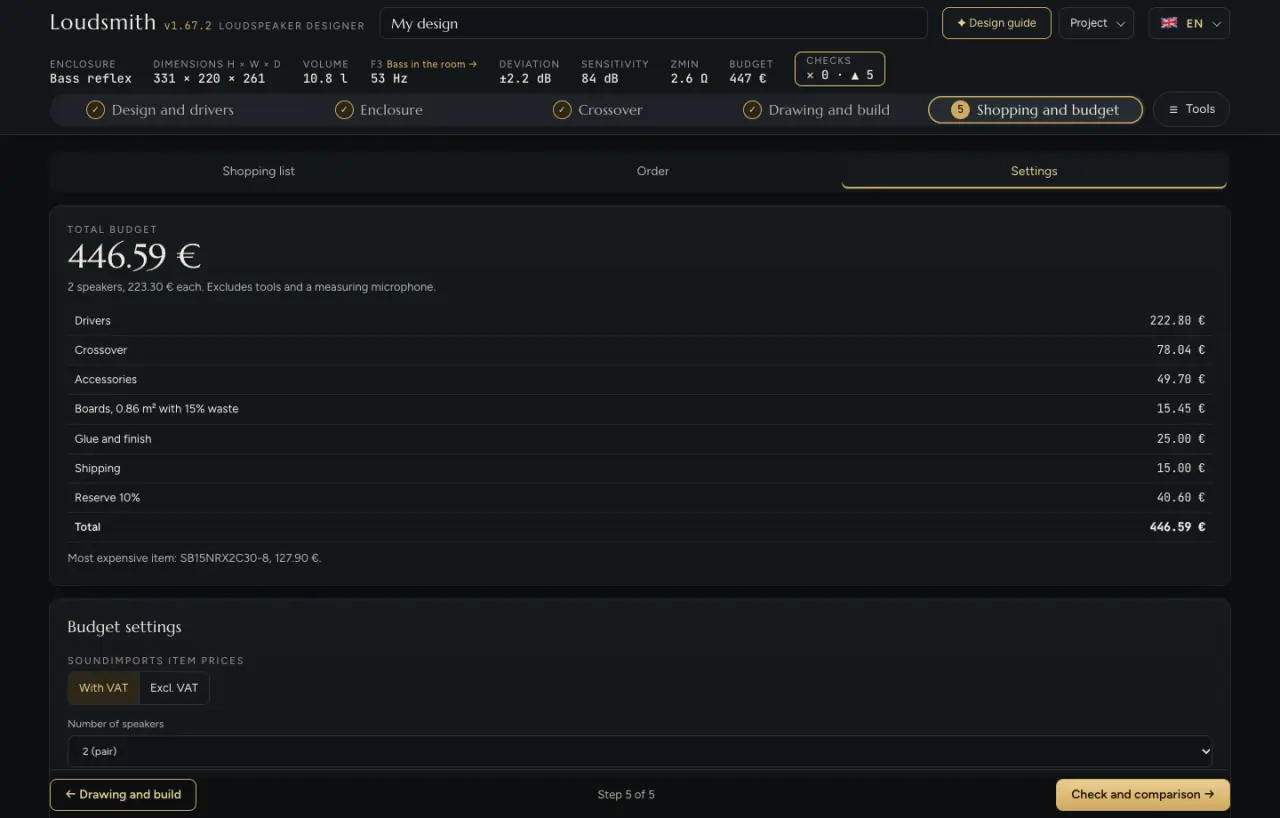
- SoundImports item prices: With VAT / Excl. VAT
- Excl. VAT divides the shop prices by 1.21. Boards, glue, shipping and reserve are your own amounts and do not change.
- Number of speakers
- 1 to 6, a pair by default. It multiplies the shopping list and the cut list, and checks whether there are enough pieces in stock.
- My budget, € (0 = no limit)
- Turns on the “within budget” or “over budget” bar.
- Board, € per m², Glue and finish, Shipping, Reserve %
- Your estimates: 18 €/m², 25 €, 15 € and 10 % by default.
Tool: Check and comparison
Checks the design against hi-fi targets, finds fixes for problems and compares the design with built speakers. Sub-tabs: Check, Directivity and score, Comparison and Response values. At the top there is always the Match to hi-fi targets gauge, a sentence with the biggest problem and the Stricter high-end targets box (F3 at 85 % and flatness of ±2 dB instead of ±3 dB). These are this app’s targets, not certification to any standard.
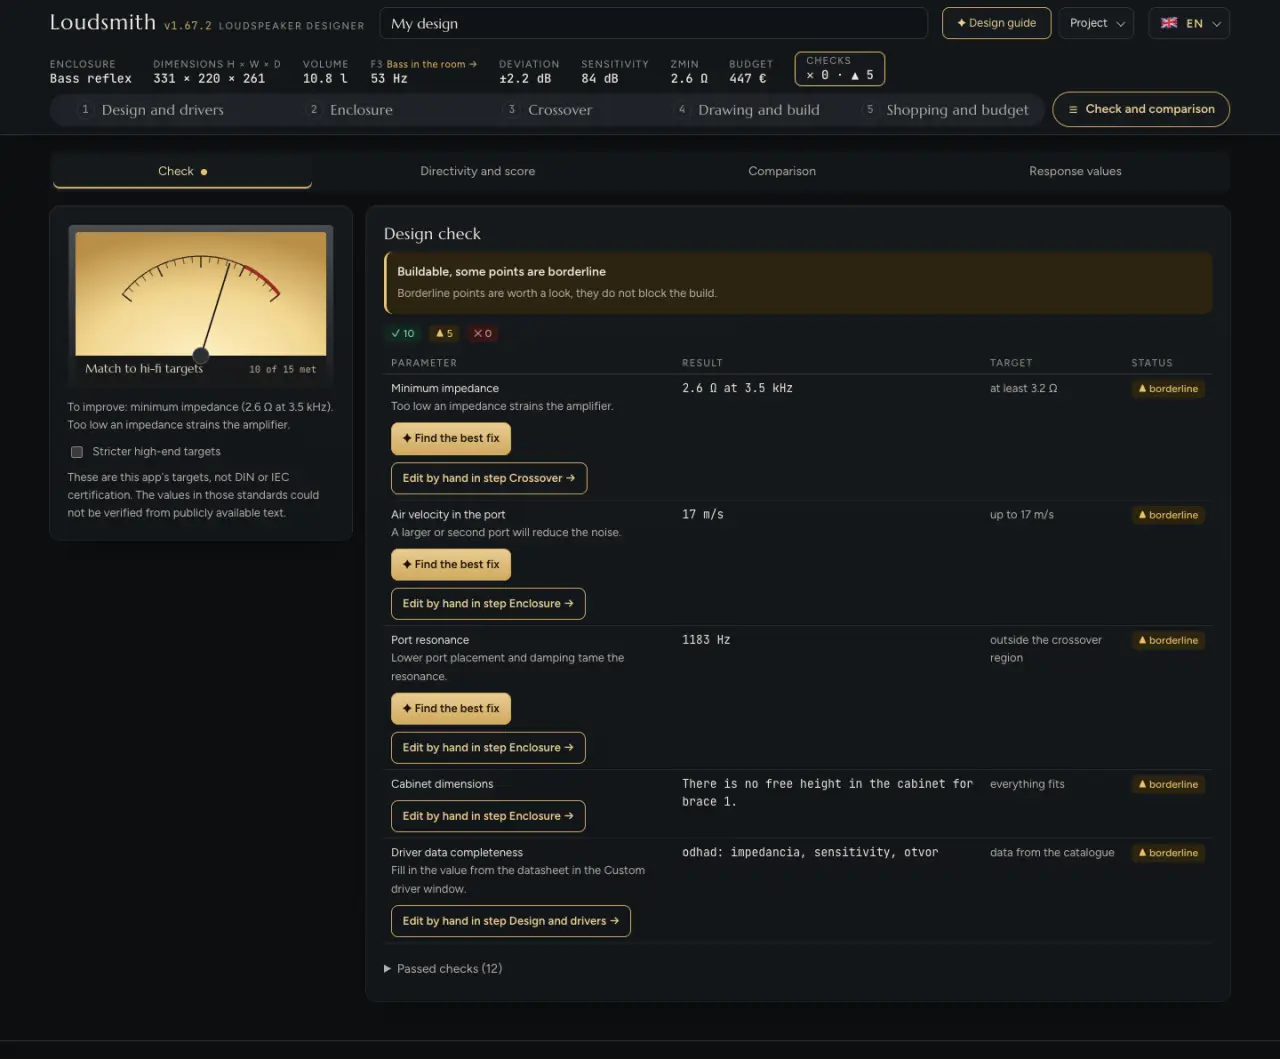
Design check
The bar at the top says whether the design is Ready to build, buildable, some points are borderline, or you need to resolve the failed points before building. The table shows the failed (✕) and borderline (▲) points with the result, the target and advice. Points that pass are in a collapsible section at the bottom. The status “○ needs measuring” means it cannot be predicted from the model.
- Inline fields
- For some points you can change what affects them right in the table, for example the largest volume, placement, edge rounding, target loudness, amplifier, crossover frequency or woofer wiring. Every change recalculates the whole design.
- ✦ Find the best fix
- The designer tries several specific changes, recalculates each one and shows up to 5 options with the new value of the point and the number of problems in the whole design. Clicking Best or Apply applies the change.
- Edit by hand in step X →
- Switches to the step where that point is set.
What is checked (✓ passes, ▲ borderline):
- Lower bass limit
- F3 of at most 60 Hz for bookshelf, 45 Hz for floorstanding and 32 Hz for a subwoofer. A larger volume, a larger woofer, lower tuning or placement closer to the wall will help.
- On-axis flatness
- Response from 100 Hz to 16 kHz within ±3 dB. A different tweeter, a different crossover frequency or more edge rounding will help.
- Maximum loudness at 40, 50 or 63 Hz and at 150 Hz
- At least the target loudness minus 6 dB in the bass and the full target loudness at 150 Hz. The result states what limits the loudness: amplifier, power handling, excursion or port.
- Speaker sensitivity
- Only if a target sensitivity is entered: a deviation of at most 1.5 dB.
- Minimum impedance
- At least 3.2 Ω (or 0.8 times the nominal impedance), and at least 6 Ω with a target sensitivity of 90 dB or more.
- Bass delay
- At most 20 ms, borderline up to 30 ms.
- Air velocity in the port and Port resonance
- At most 17 m/s so that the port does not chuff. The port tube’s own resonance should be outside the crossover region.
- Radiator displacement
- The radiator should displace at least 1.5 times more air than the woofer. The app offers a more suitable radiator.
- Woofer Qts for a vented box or a sealed box
- 0.2 to 0.5 for bass reflex, 0.25 to 0.6 for sealed.
- Dipole bass roll-off and Woofer for a dipole
- Only for an open baffle: where the bass roll-off begins and whether the woofer has a suitable Qts and enough excursion.
- Standing wave along the cabinet height
- In a tall, narrow cabinet, when the wave falls within the woofer’s band. Damping at mid-height will help.
- Tweeter position relative to the edges
- The tweeter should not be equally far from all edges, otherwise the reflections add up. Moving it sideways will help.
- Tweeter crossover and Tweeter power headroom
- The crossover must not be too low relative to the tweeter’s resonance, and the tweeter should have a power headroom of at least 1.5 times.
- Directivity match at the crossover
- In a 2-way: the crossover should not be far above the frequency where the woofer starts to beam.
- Line length, Cabinet dimensions
- Warnings that the line is too short or that something does not fit.
- Driver data completeness and Driver data
- Missing or inconsistent driver parameters. Check them before building.
- Actual driver response, Distortion and off-axis radiation
- Only a measurement can confirm these.
Directivity and Harman score
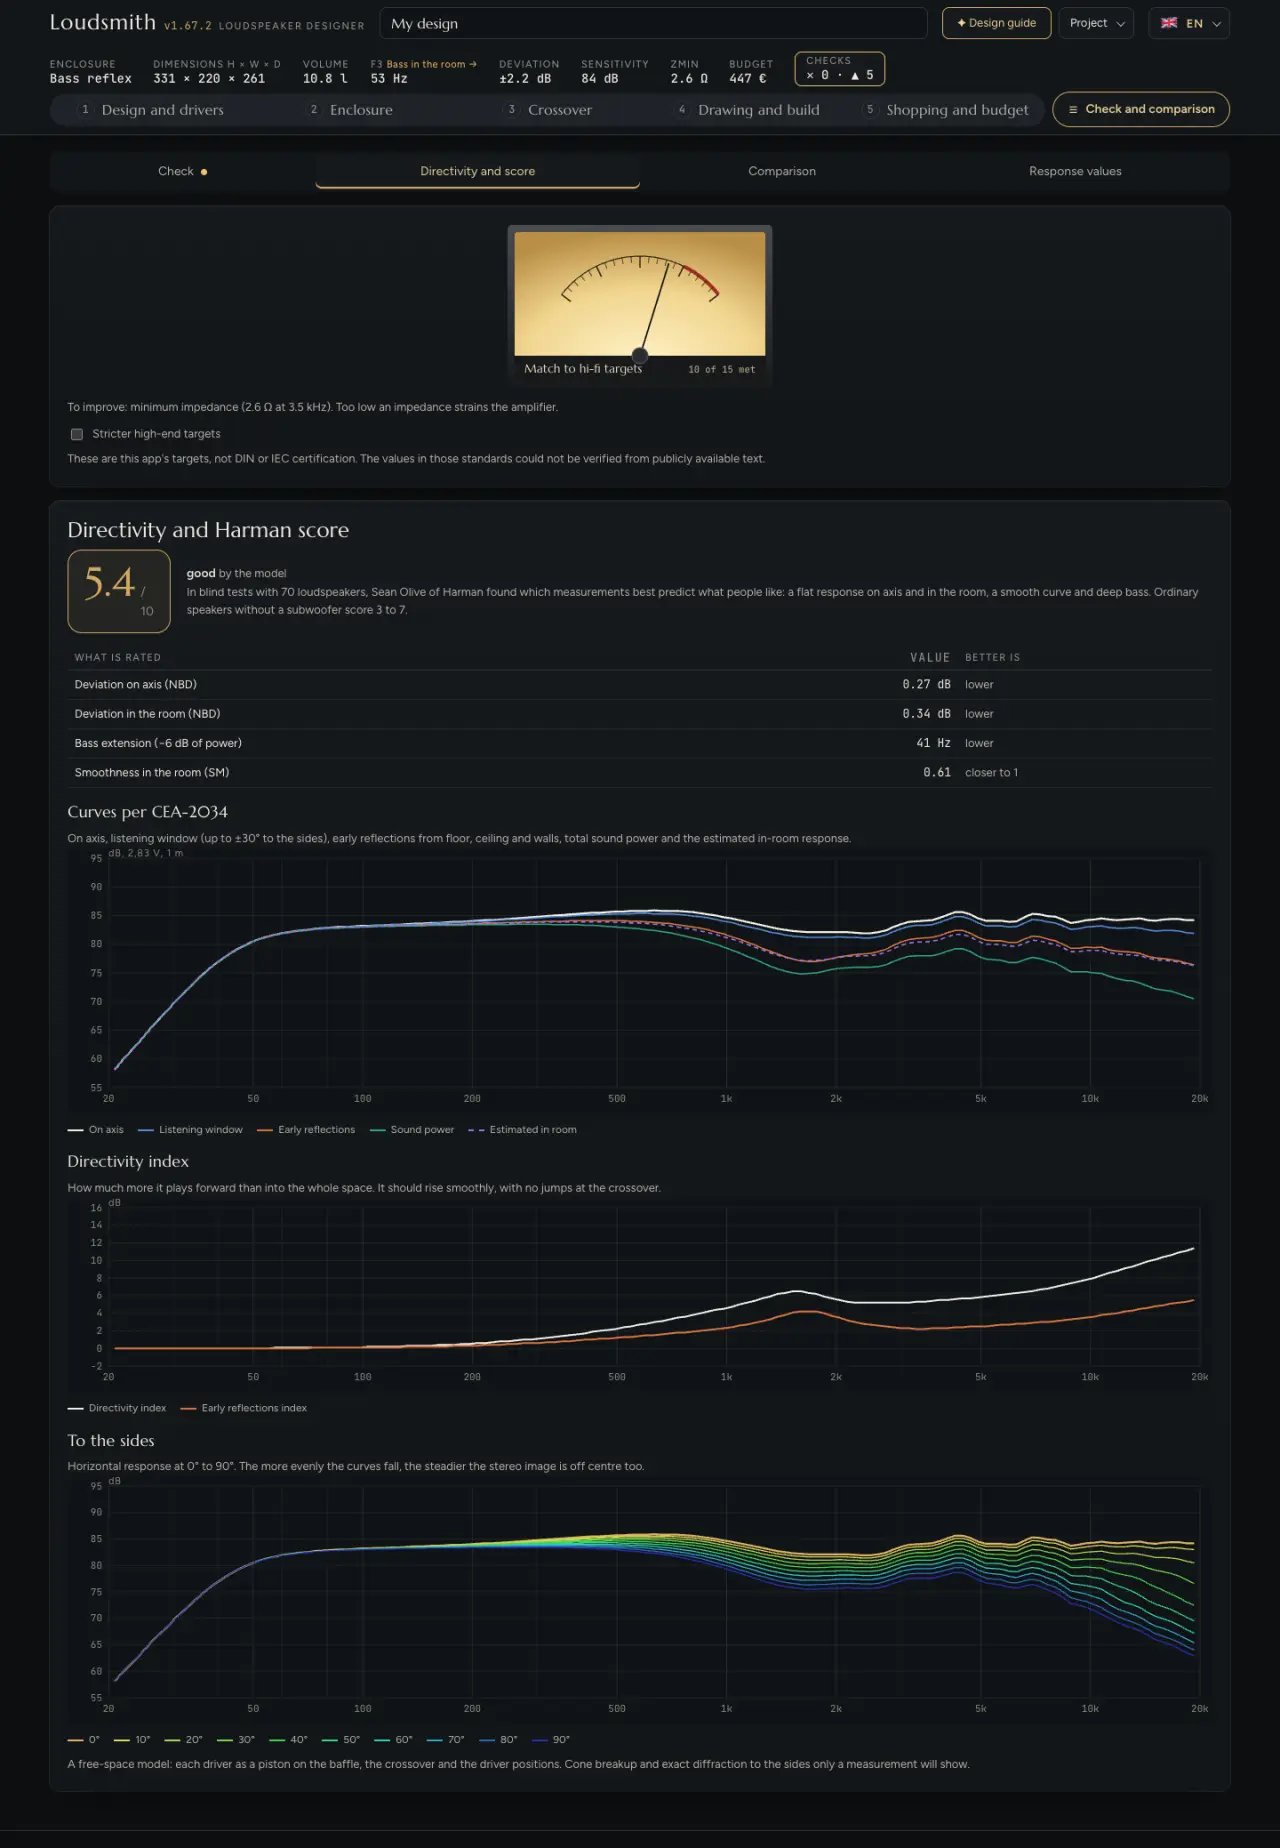
Score from 0 to 10, after Sean Olive (Harman), which predicts in blind tests what people will prefer. Typical loudspeakers without a subwoofer score 3 to 7. The table shows its components: on-axis and in-room deviations (lower is better), bass extension (lower is better) and in-room smoothness (closer to 1 is better).
- Curves per CEA-2034
- On-axis, listening window (up to ±30°), early reflections, sound power and estimated in-room response. The curves should be smooth and the sound power should fall smoothly towards the treble.
- Directivity index
- How much more the speaker radiates forwards than into the whole room. It should rise smoothly, without jumps at the crossover.
- To the sides
- Horizontal response at angles from 0° to 90°. The more evenly the curves fall, the more stable the stereo image, even off-centre.
It is a free-space model: the driver as a piston on a baffle, with the crossover and driver positions. It is not calculated for an open baffle or a subwoofer.
Comparison and response values
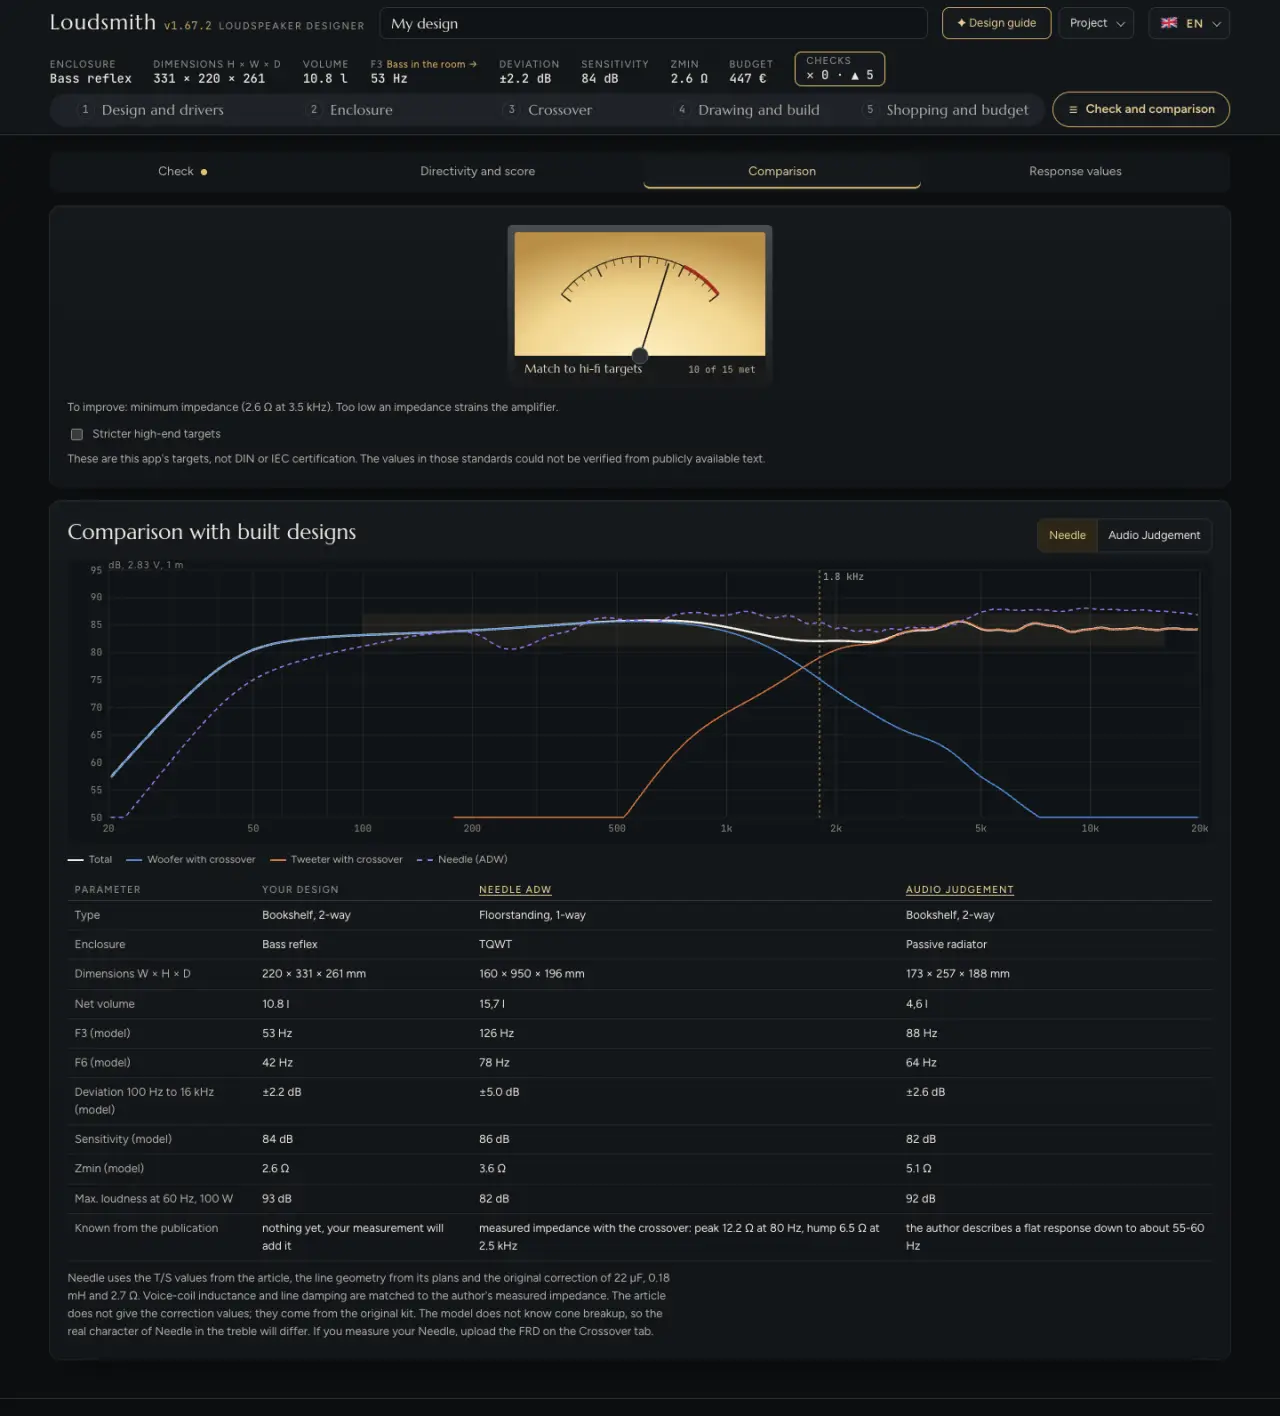
Comparison with built designs: a graph of your response against the Needle or Audio Judgement reference (switchable) and a table: form, enclosure, dimensions, volume, F3, F6, deviation, sensitivity, Zmin and maximum loudness. Response values are the levels in dB from 31 Hz to 16 kHz for your design and both references.
Tool: Room
Shows how the speaker will sound in your room and finds the best placement. It works from the current speaker: its dimensions, driver heights, radiation type and port or radiator position. At the top there is always the Room card with the inputs. Sub-tabs: Placement, Floor plan and bass and Room modes. Wall materials are not set: the overall absorption is represented by the T60 reverberation time.
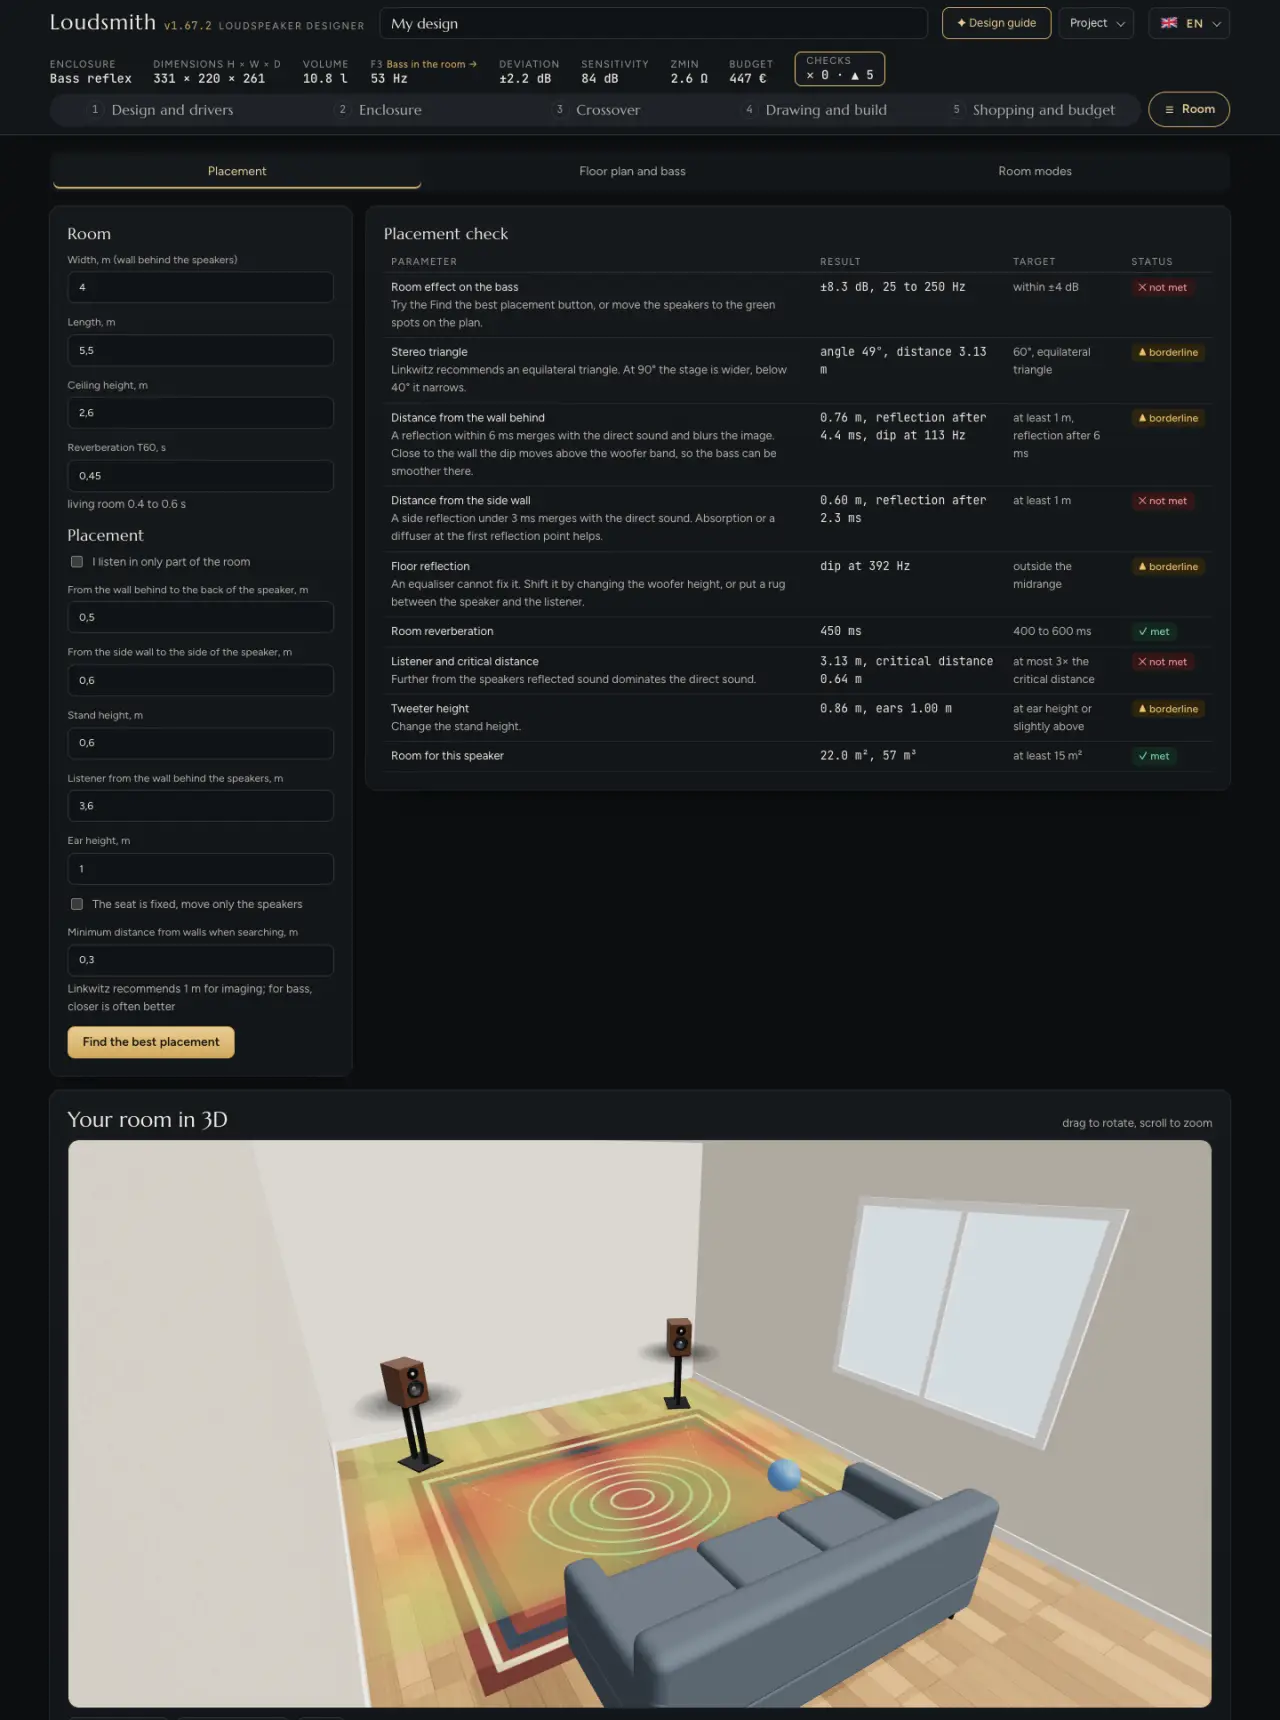
- Width (wall behind the speakers), Length, Ceiling height, m
- Room dimensions. They determine the modes (where the bass booms or is missing), the Schroeder frequency and the reflections.
- Reverberation T60, s
- How long the sound takes to die away. A living room has 0.4 to 0.6 s. Shorter reverberation reduces the mode peaks.
- I listen in only part of the room
- Turns on a listening zone in a large room: the zone’s position and size and the speaker spacing. The pair then stands symmetrically around the centre of the zone.
- From the wall behind to the back of the speaker, From the side wall to the side of the speaker, m
- Speaker position. It changes the wall reflections and the bass.
- Stand height, m
- Bookshelf only. It changes the floor reflection and the tweeter height relative to the ears.
- Listener from the wall behind the speakers, Ear height, m
- Listening position.
- The seat is fixed, move only the speakers
- The sofa does not move during the search.
- Minimum distance from walls when searching
- How close to a wall the search may move a speaker.
- Find the best placement
- Searches many speaker and listener positions and picks the one where the bass is most even and the stereo triangle closest to equilateral. Apply overwrites the fields.
Placement check rates: the room’s effect on the bass (within ±4 dB), the stereo triangle (50° to 70°), the distance from the rear wall (at least 1 m), the distance from the side wall, the floor reflection, the reverberation (400 to 600 ms), the listener’s distance relative to the critical distance, the tweeter height relative to the ears and the room size. Your room in 3D shows the room with the speakers and the listener. Views: from the listening position, from a corner or from above, with a bass map on the floor and the stereo triangle.
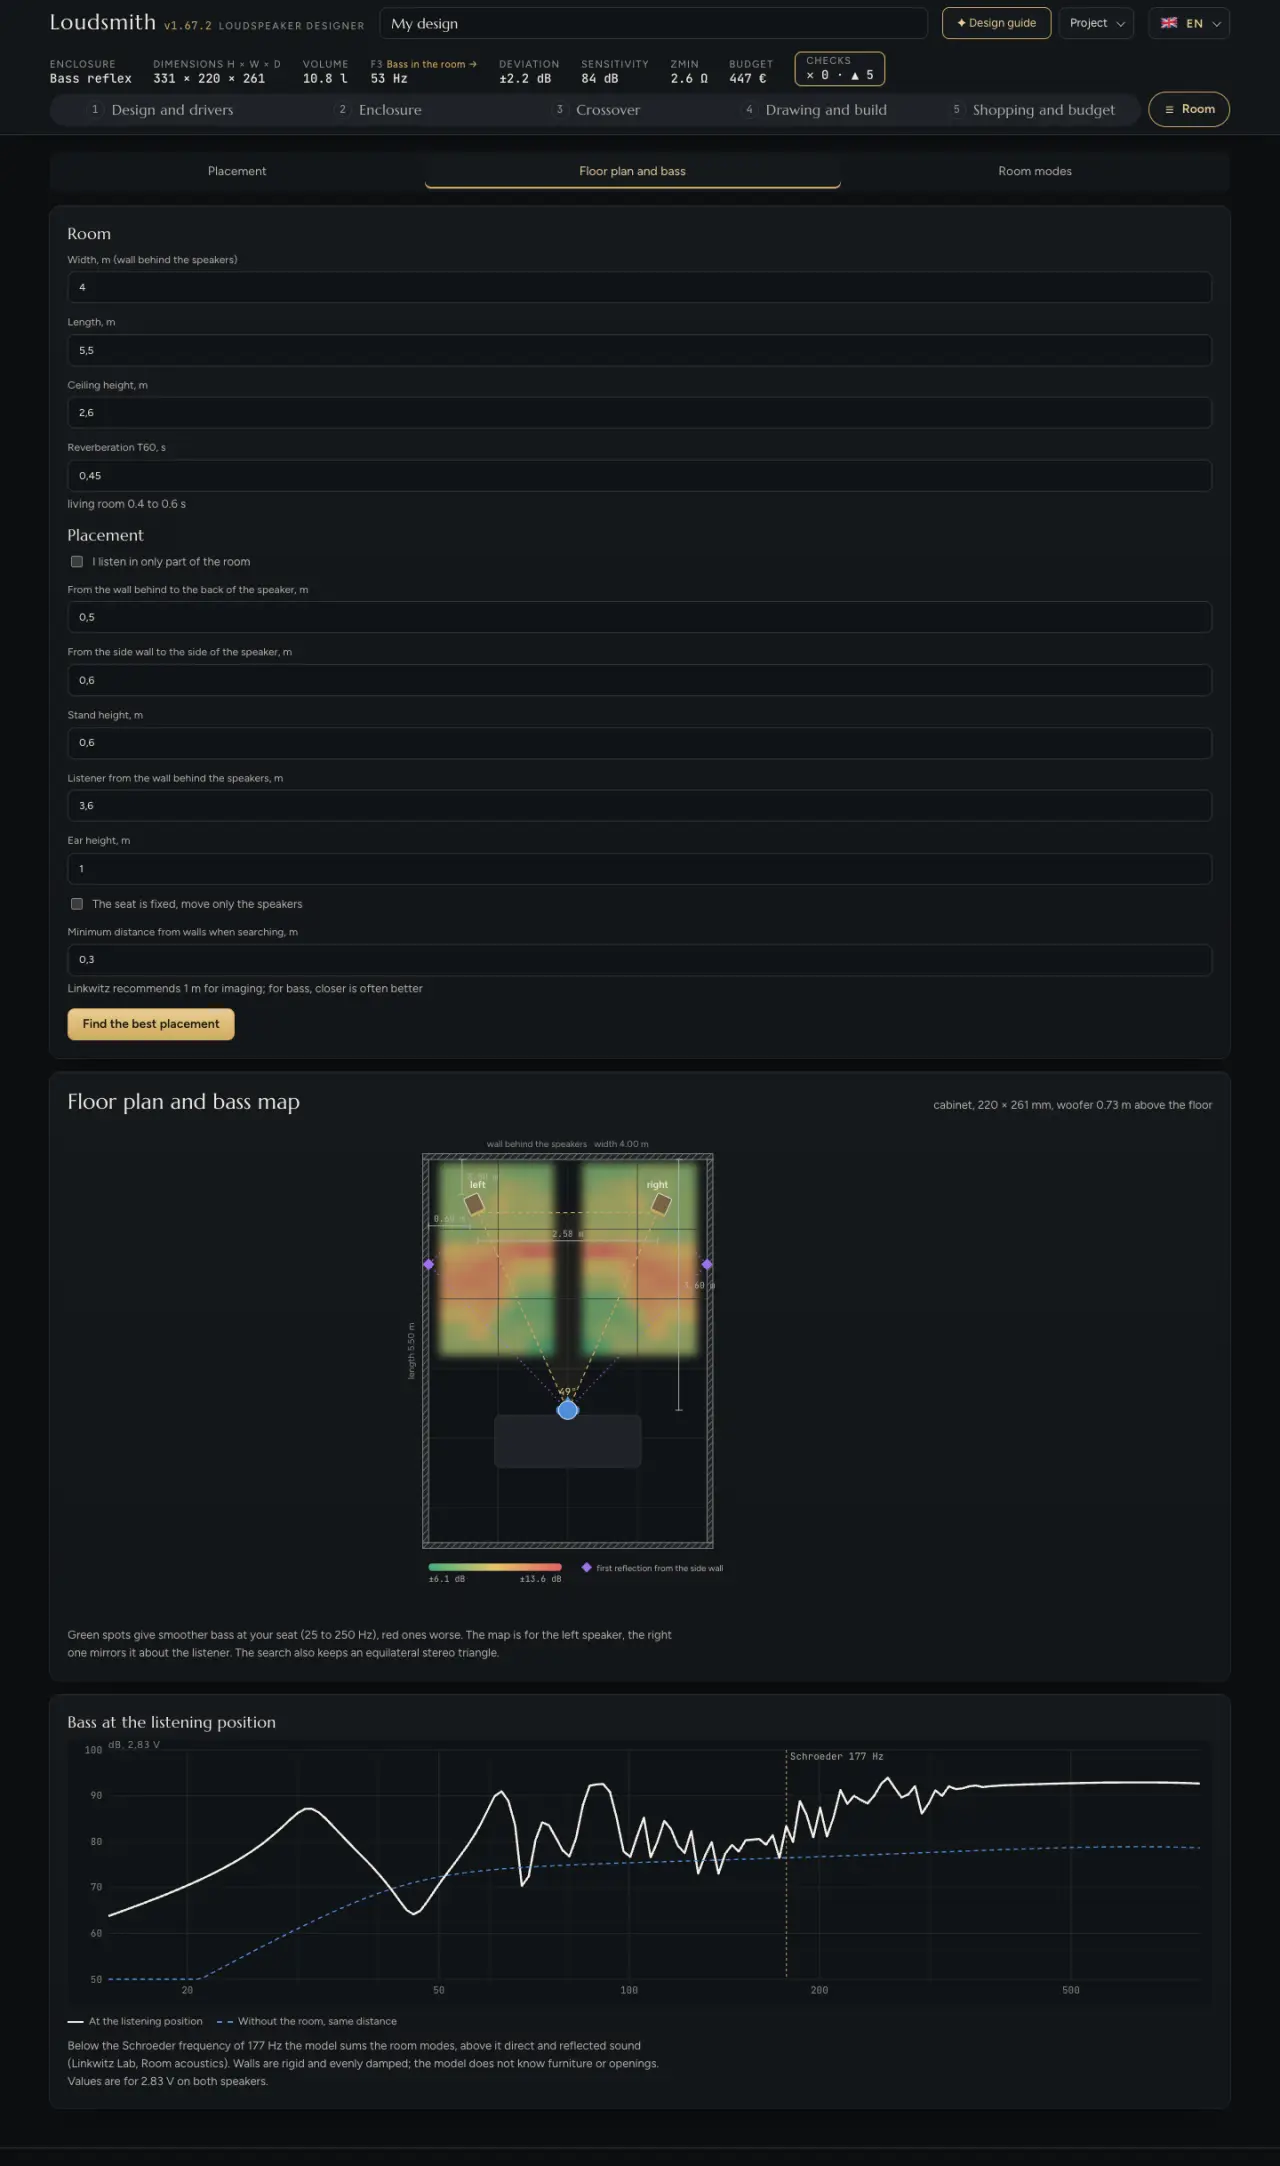
Floor plan and bass map: a top-down floor plan with the speakers, the listener, the triangle angle, the first reflection and dimensions. The coloured background shows, for each position of the left speaker, how even the bass will be at the listener: green is better, red is worse. Bass at the listening position compares the in-room response with the response without the room. The difference is what the room adds. Below the Schroeder frequency mark, the modes dominate.
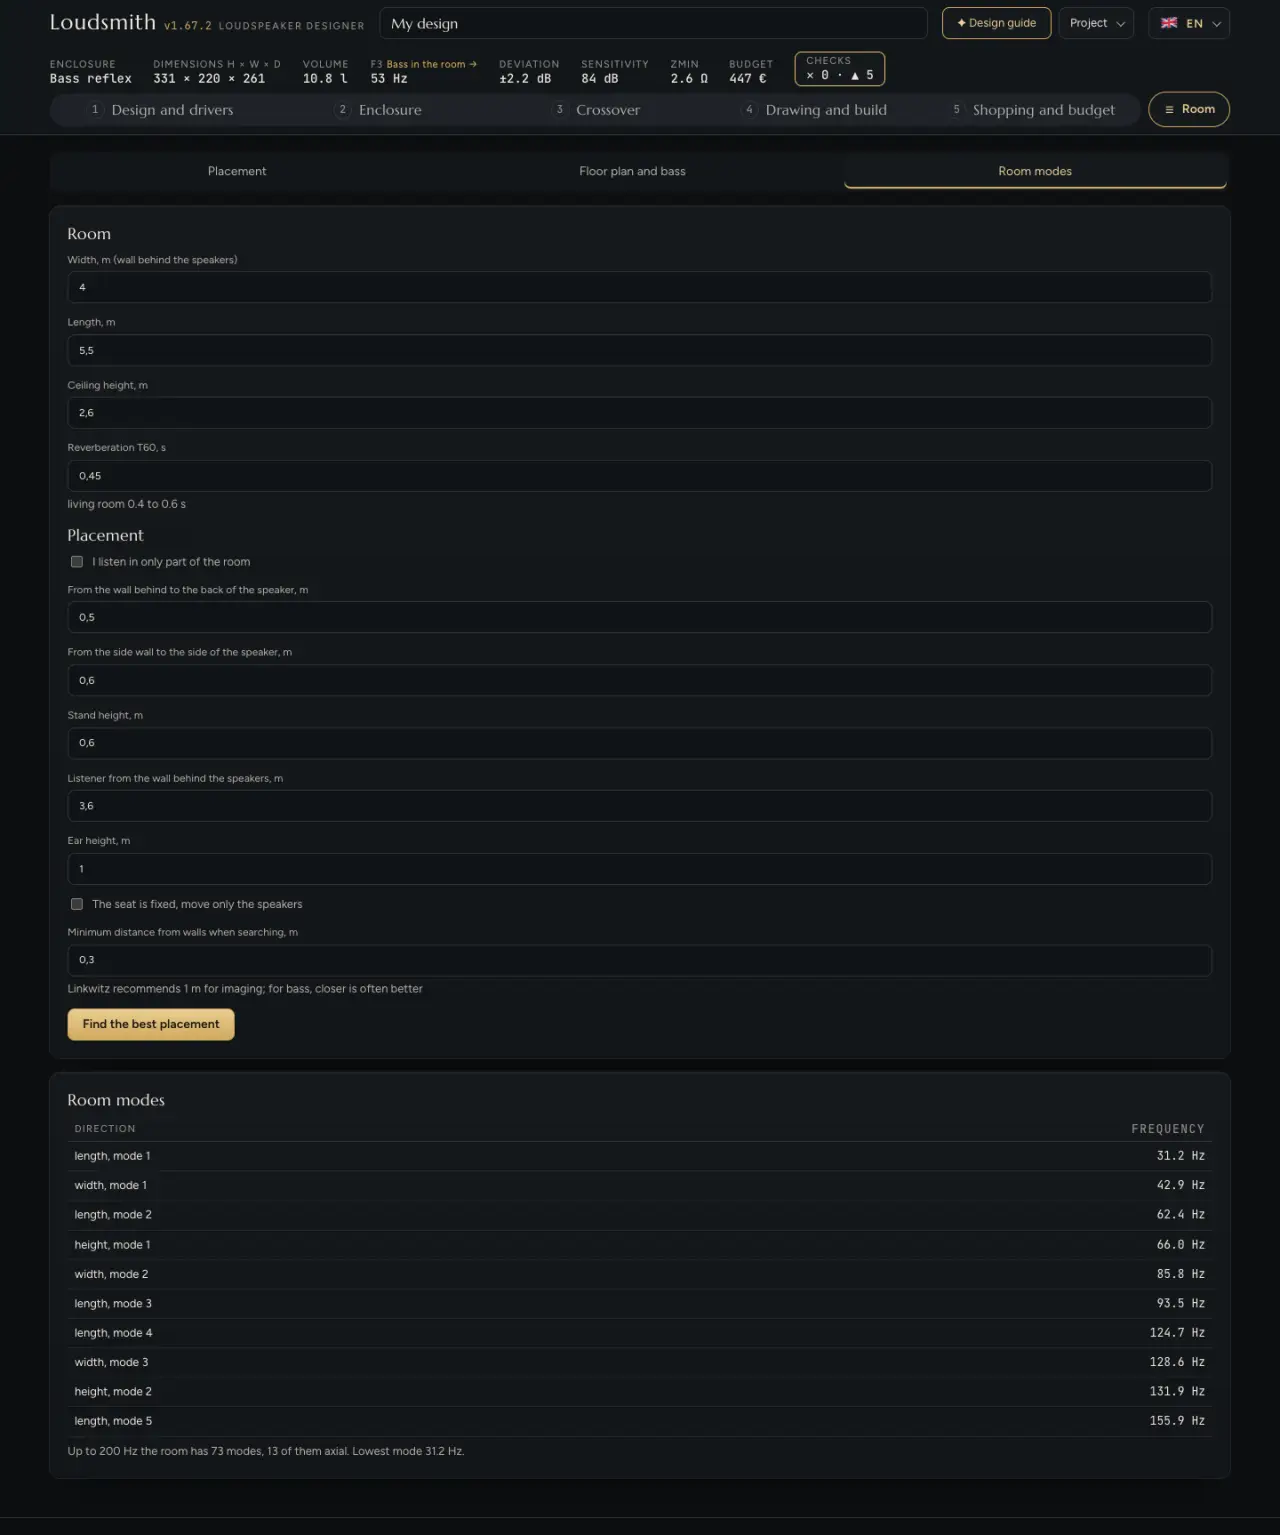
Room modes: frequencies up to 200 Hz where the bass may boom or be missing, based on the room’s width, length and height.
Tool: Sound simulation
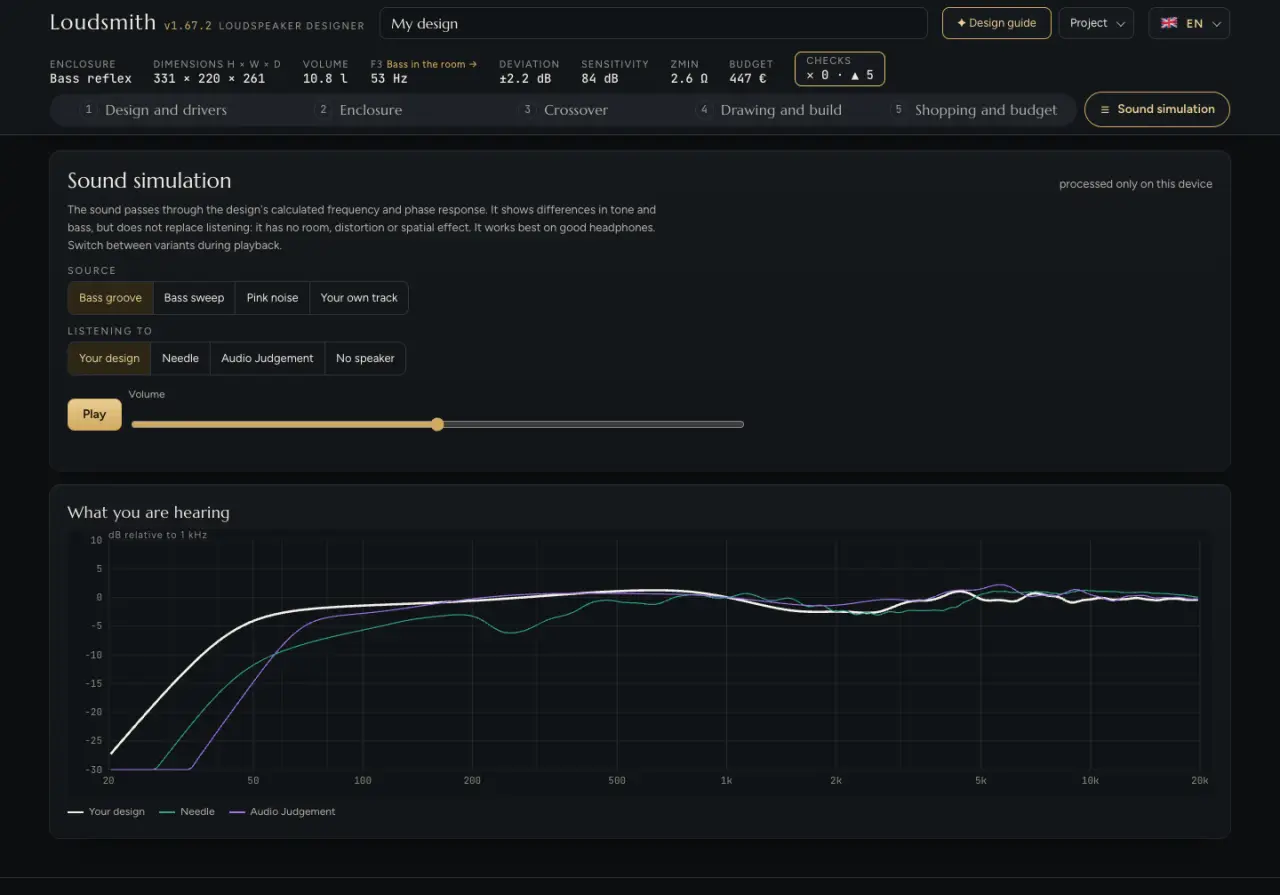
Plays sound through the calculated response of the design, so you can hear differences in tonal balance and bass. It does not include the room, distortion or spaciousness. It sounds best on good headphones. Everything is processed only on your device.
- Source
- Bass groove (a generated loop), bass sweep from 25 to 250 Hz, pink noise or your own track (MP3, AAC, WAV from your device).
- Listening to
- Your design, Needle, Audio Judgement or no speaker. It switches smoothly during playback, so you can compare directly.
- Play / Stop and Volume
- There is a protective limiter on the output. If you change the design during playback, you hear the new response after stopping and starting again.
The What you are hearing graph compares the shape of the responses, shifted to 0 dB at 1 kHz. A curve that falls off earlier in the bass sounds leaner.
Tool: Project library
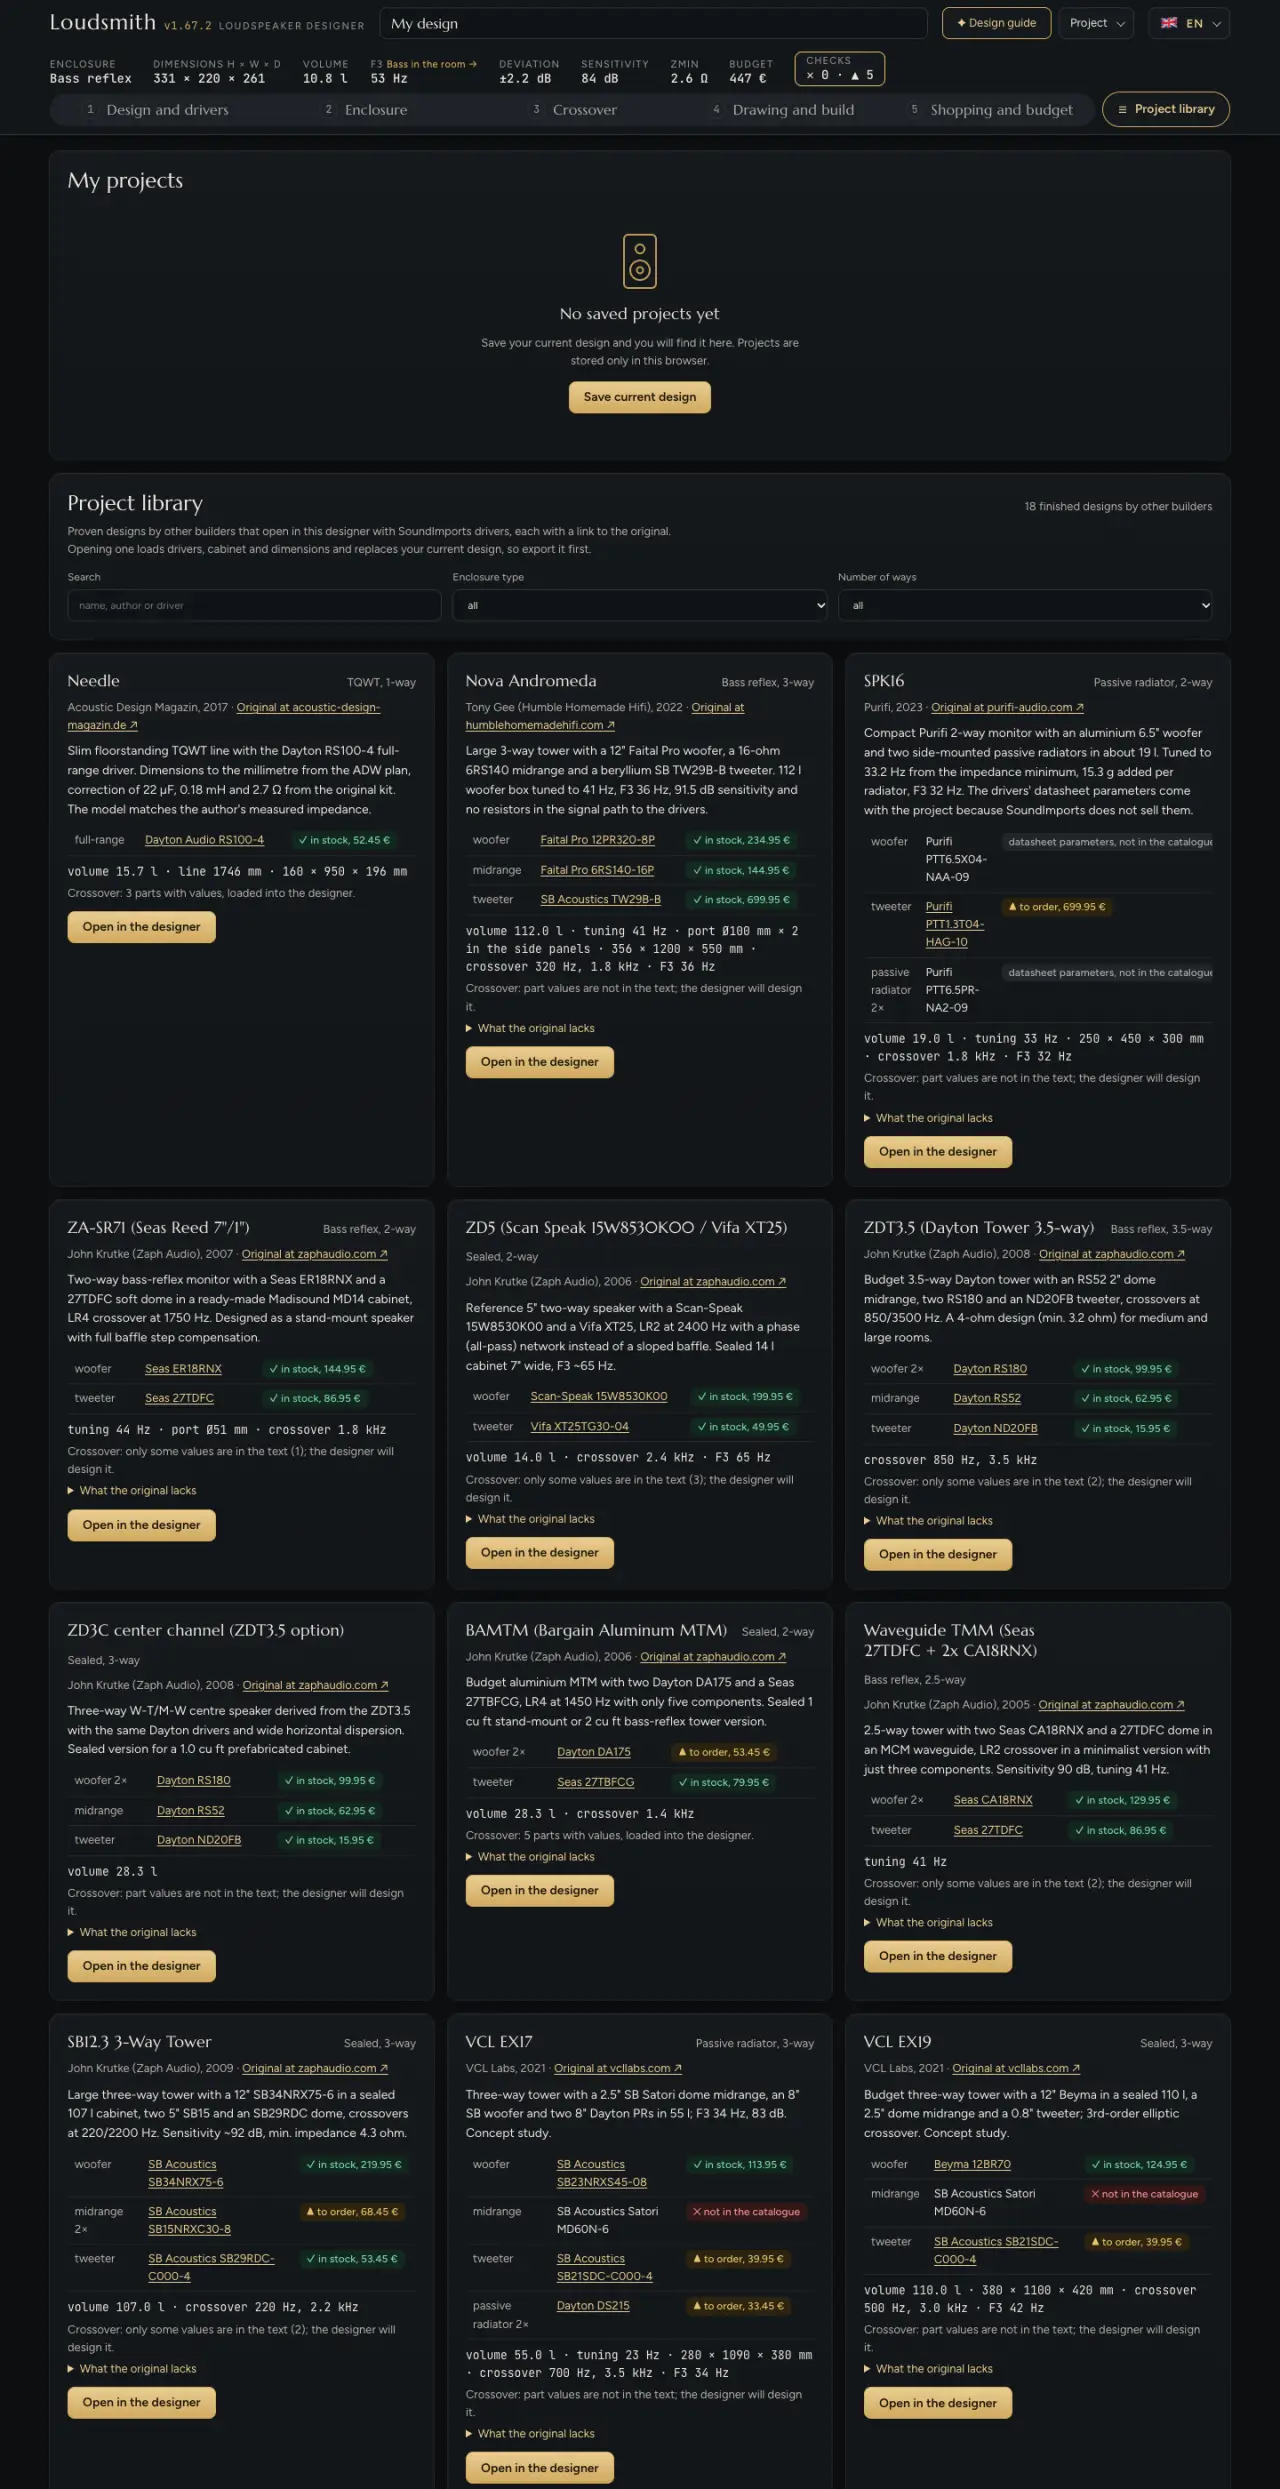
My projects are designs saved in this browser (up to 60, without photos). Save current design saves it under the project name. The project cards show the volume, dimensions, F3 and crossover point. Open in the designer replaces the current design. To move a project to another device, use Project → Export.
Project library contains finished designs by other authors that the designer can open. Filters: search (name, author, driver), cabinet type and number of ways. Each card shows the author, a link to the original, the drivers with their availability in the shop, volume, tuning, dimensions, crossover point and what is missing in the original. Open in the designer loads the drivers, cabinet and dimensions. If the author published the full crossover, it is loaded as a custom circuit; otherwise the designer designs it itself. Drivers not in the shop are added as custom drivers. Export your current design before opening one.
Tool: Calculators
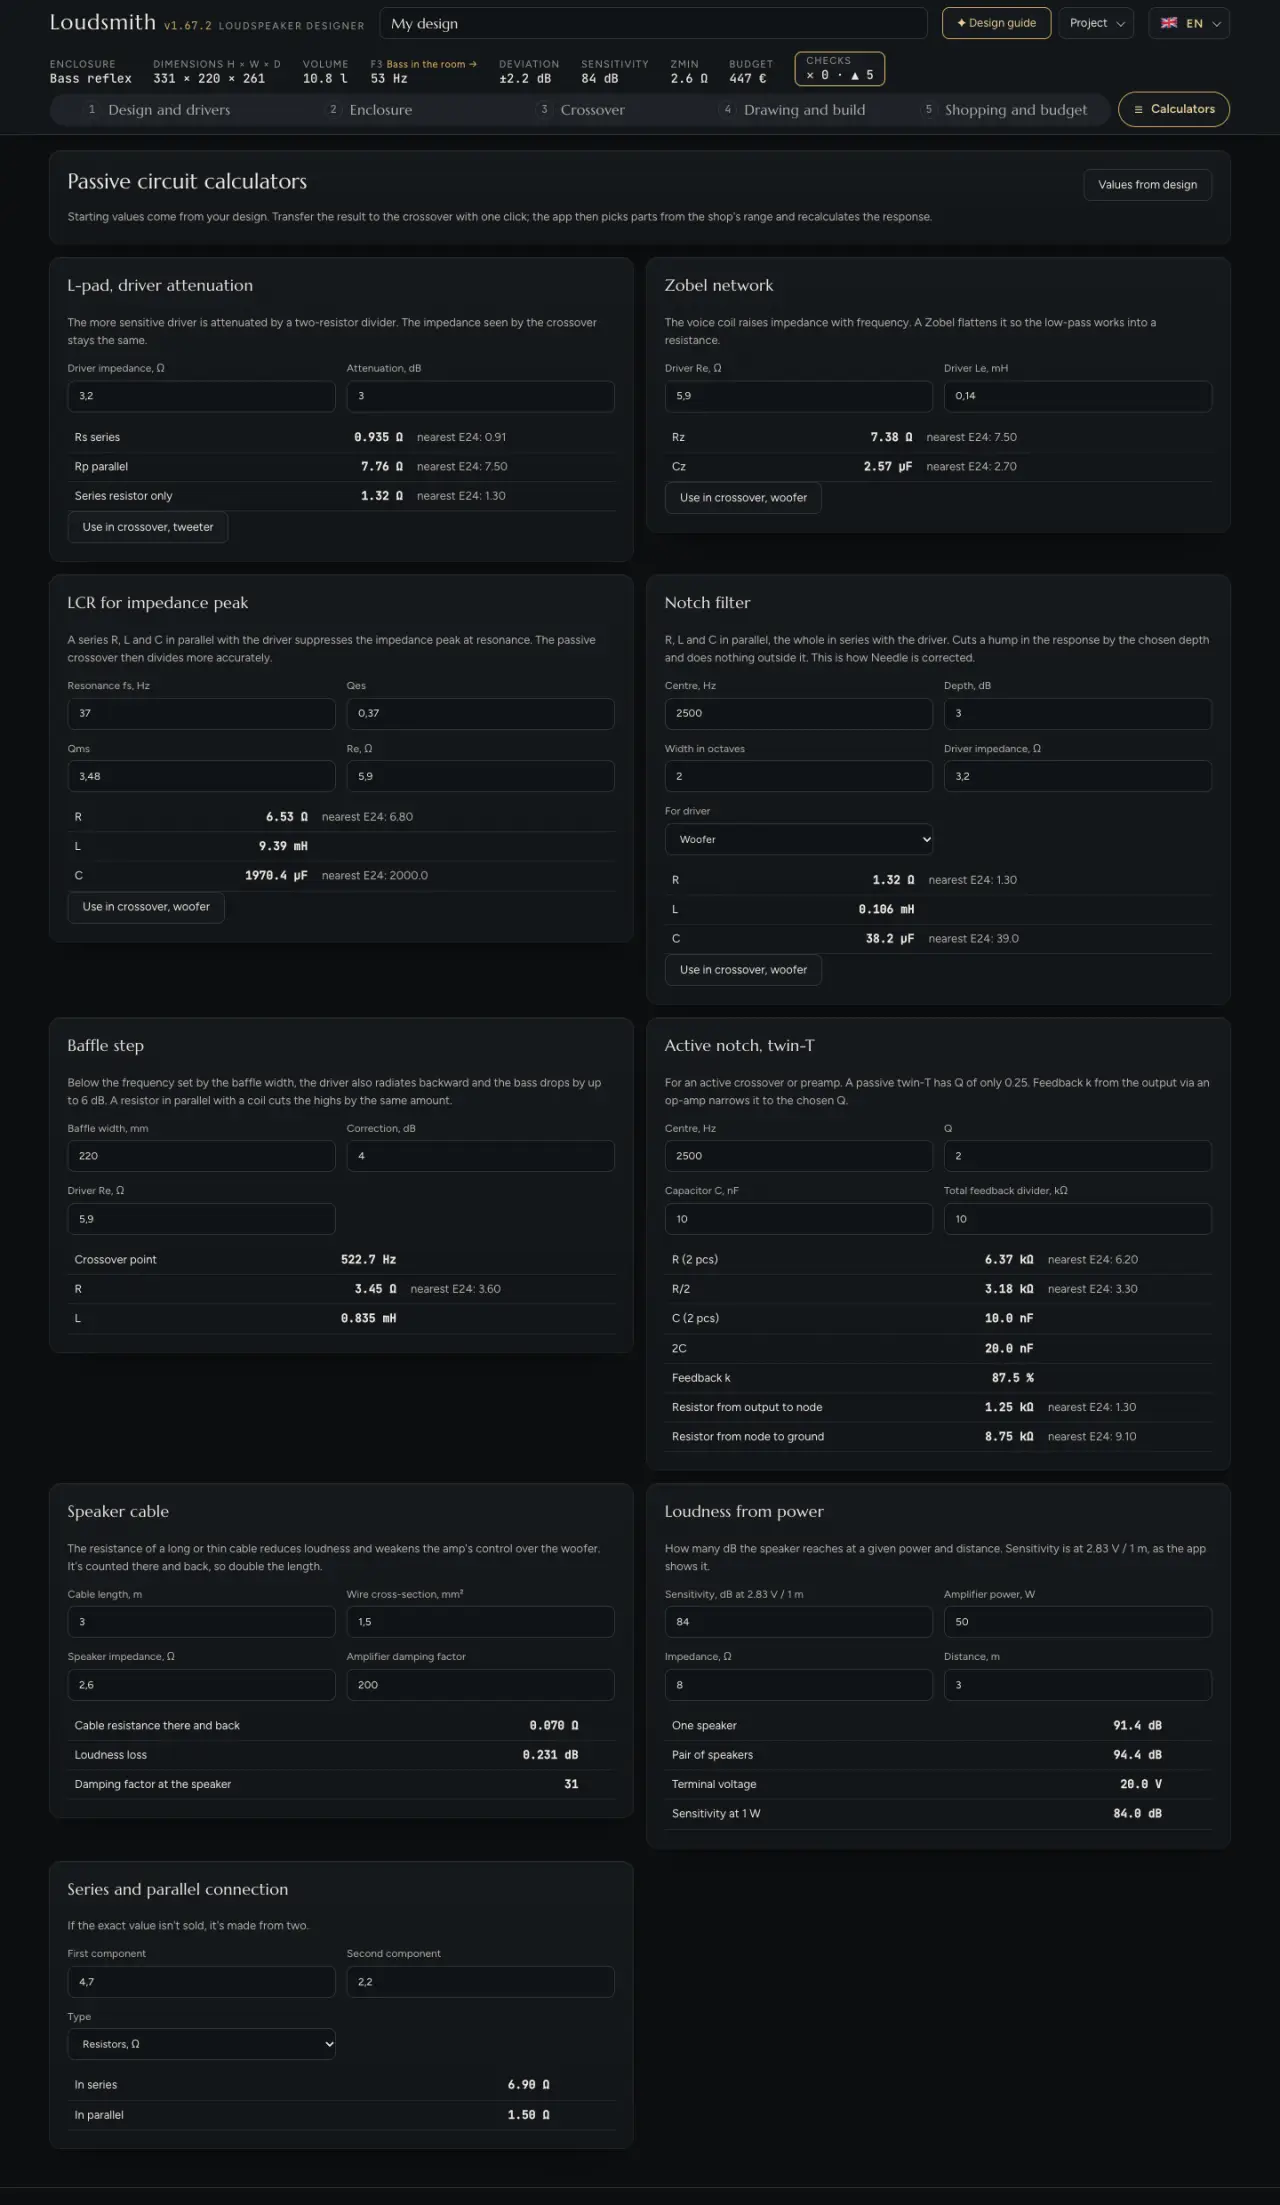
Nine calculators for parts and common calculations. The starting values come from your design (drivers, front baffle width, impedance, sensitivity). When you change the design, the calculators do not update by themselves: that is what the Values from design button is for. Results are calculated as you type, and for resistors and capacitors the nearest E24 value is shown too, i.e. a commonly sold value.
Five calculators have a Use in crossover button: it writes the values into the crossover, switches it to manual values, opens the Crossover step and recalculates the design with parts from the shop. The other crossover parts are kept.
- L-pad, driver attenuation
- The driver impedance and the attenuation in dB give Rs (in series) and Rp (in parallel), which turn down a more sensitive tweeter while the crossover still sees the same impedance. It also shows a variant with a series resistor only.
- Zobel network
- From the woofer’s Re and Le it calculates Rz and Cz, which flatten the rising impedance of the voice coil.
- LCR for impedance peak
- From fs, Qes, Qms and Re it calculates R, L and C that suppress the impedance peak at resonance.
- Notch filter
- The centre, depth, width in octaves and driver impedance give the R, L and C of a notch for the chosen driver. When you change the driver, update its impedance too.
- Baffle step
- From the front baffle width it calculates the transition frequency and the R and L of the correction for a full-range driver.
- Active notch, twin-T
- Values for an op-amp notch (for an active crossover or a preamplifier).
- Speaker cable
- Cable resistance there and back, loss of loudness and damping factor at the speaker.
- Loudness from power
- How many dB one speaker and a pair reach at a given power and distance (in free space), and the voltage at the terminals.
- Series and parallel connection
- How to build a value that is not on sale from two resistors, coils or capacitors.
Values in the Calculators, Equaliser and Horn calculator are kept when you switch between tools, but return to the starting values when you reload the page.
Tool: Equaliser (DSP)
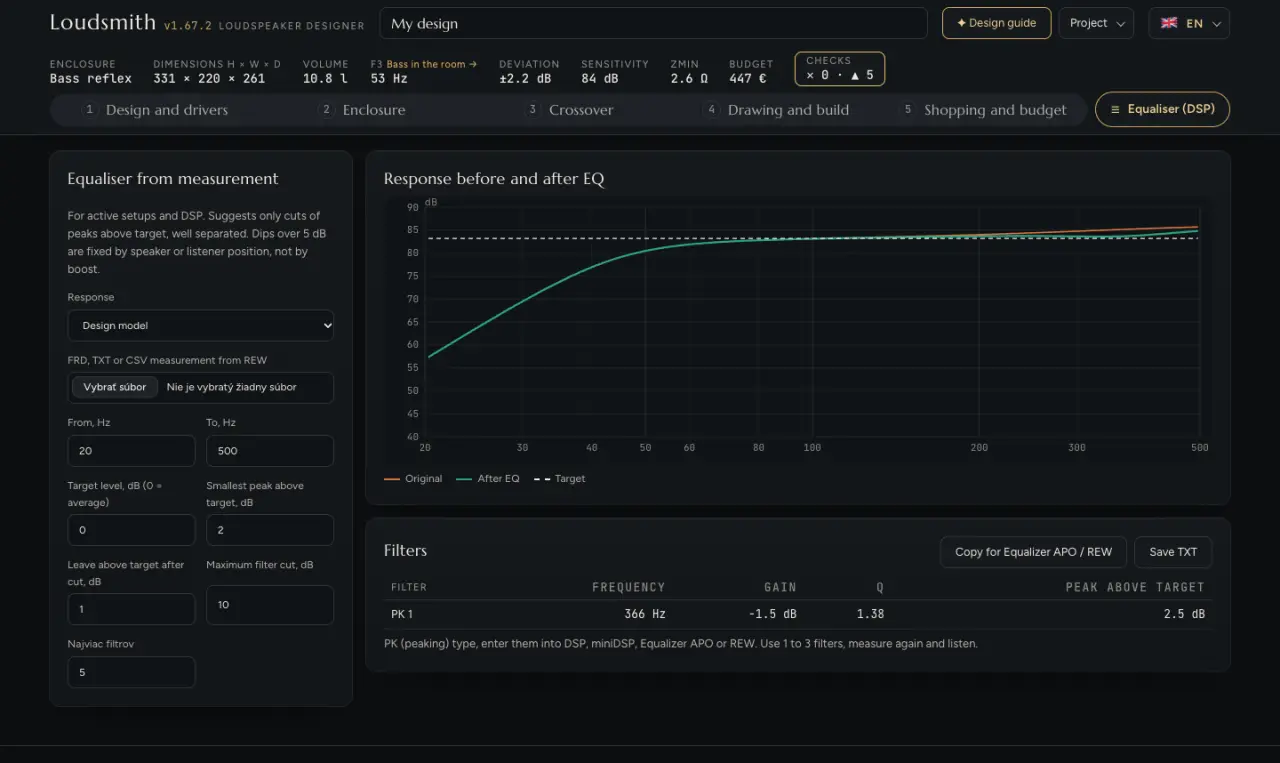
Designs parametric filters for a DSP, playback software or miniDSP. It does not write anything into the design. It only designs cuts of peaks. Dips deeper than 5 dB are only listed, because boosting will not fix them: a different speaker or listener position will help.
- Response and FRD, TXT or CSV measurement from REW
- Either the design model or a loaded measurement is equalised. Measurements with more than 1000 points are thinned out; there must be at least 8 points.
- From, To, Hz
- The band in which peaks are searched for. By default 20 to 500 Hz, where the room has the most effect.
- Target level, dB (0 = average)
- The level above which peaks are cut. At 0 the middle level (median) of the smoothed response in the band is used.
- Smallest peak above target, Leave above target after cut, Maximum filter cut, Max filters
- How small a peak is still worth treating, how much of a peak to leave above the target (a more cautious correction), the gain limit of a single filter and the number of filters.
The Response before and after EQ graph and the Filters table (frequency, gain, Q, peak height). Copy for Equalizer APO / REW and Save TXT give the filters in a form ready to paste. Use 1 to 3 filters, measure again and listen.
Linkwitz transform (only for a sealed box with known woofer parameters) moves the cabinet resonance lower so the bass goes deeper. Target frequency fp sets where it moves to, Target Qp the shape of the roll-off (0.707 flattest bass, 0.5 fastest decay). The table shows the new −3 dB point, the boost needed in the deepest bass and how many times larger the excursion will be. Above 6 dB you need power and excursion headroom; above 12 dB it is too much. The filter is a biquad for 48 kHz in a format for both miniDSP and Equalizer APO.
Tool: Horn calculator
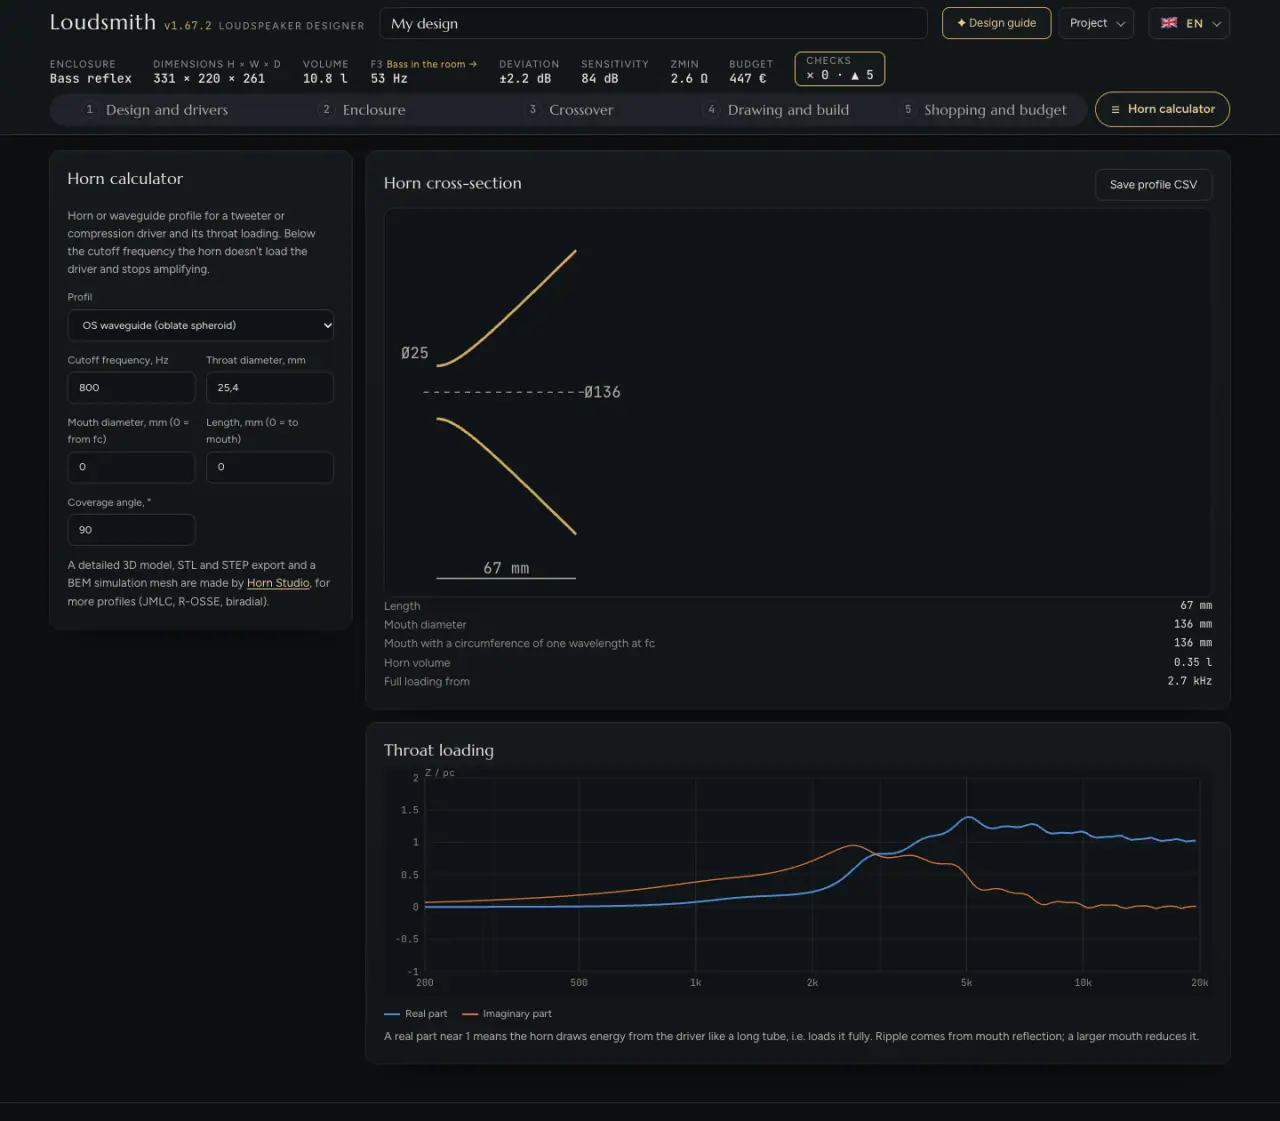
A standalone calculator for the profile of a horn or waveguide for a tweeter or compression driver. It is not linked to the design. Below the cutoff frequency the horn does not load the driver and stops providing gain.
- Profile
- OS waveguide, Exponential, Hypex, Tractrix or Conical.
- Cutoff frequency, Throat diameter, Mouth diameter (0 = from fc), Length (0 = to mouth)
- With mouth set to 0, the mouth is chosen so that its circumference is one wavelength at the cutoff frequency. With Tractrix the mouth is always derived from the cutoff frequency.
- Coverage angle and Parameter T
- Angle for the OS waveguide and the conical horn. T for Hypex (1 = exponential, less = slower start).
The output is a cross-section of the horn with dimensions, the length, mouth diameter, volume, full-loading frequency and the Throat loading graph: a real part close to 1 means the horn fully loads the driver. Save profile CSV saves the profile (distance, radius, diameter) for a template or CAD. It is a one-dimensional model: it does not calculate directivity or the 3D shape. For a 3D model and STL, we refer you to the Horn Studio tool.
Tool: Article and PDF
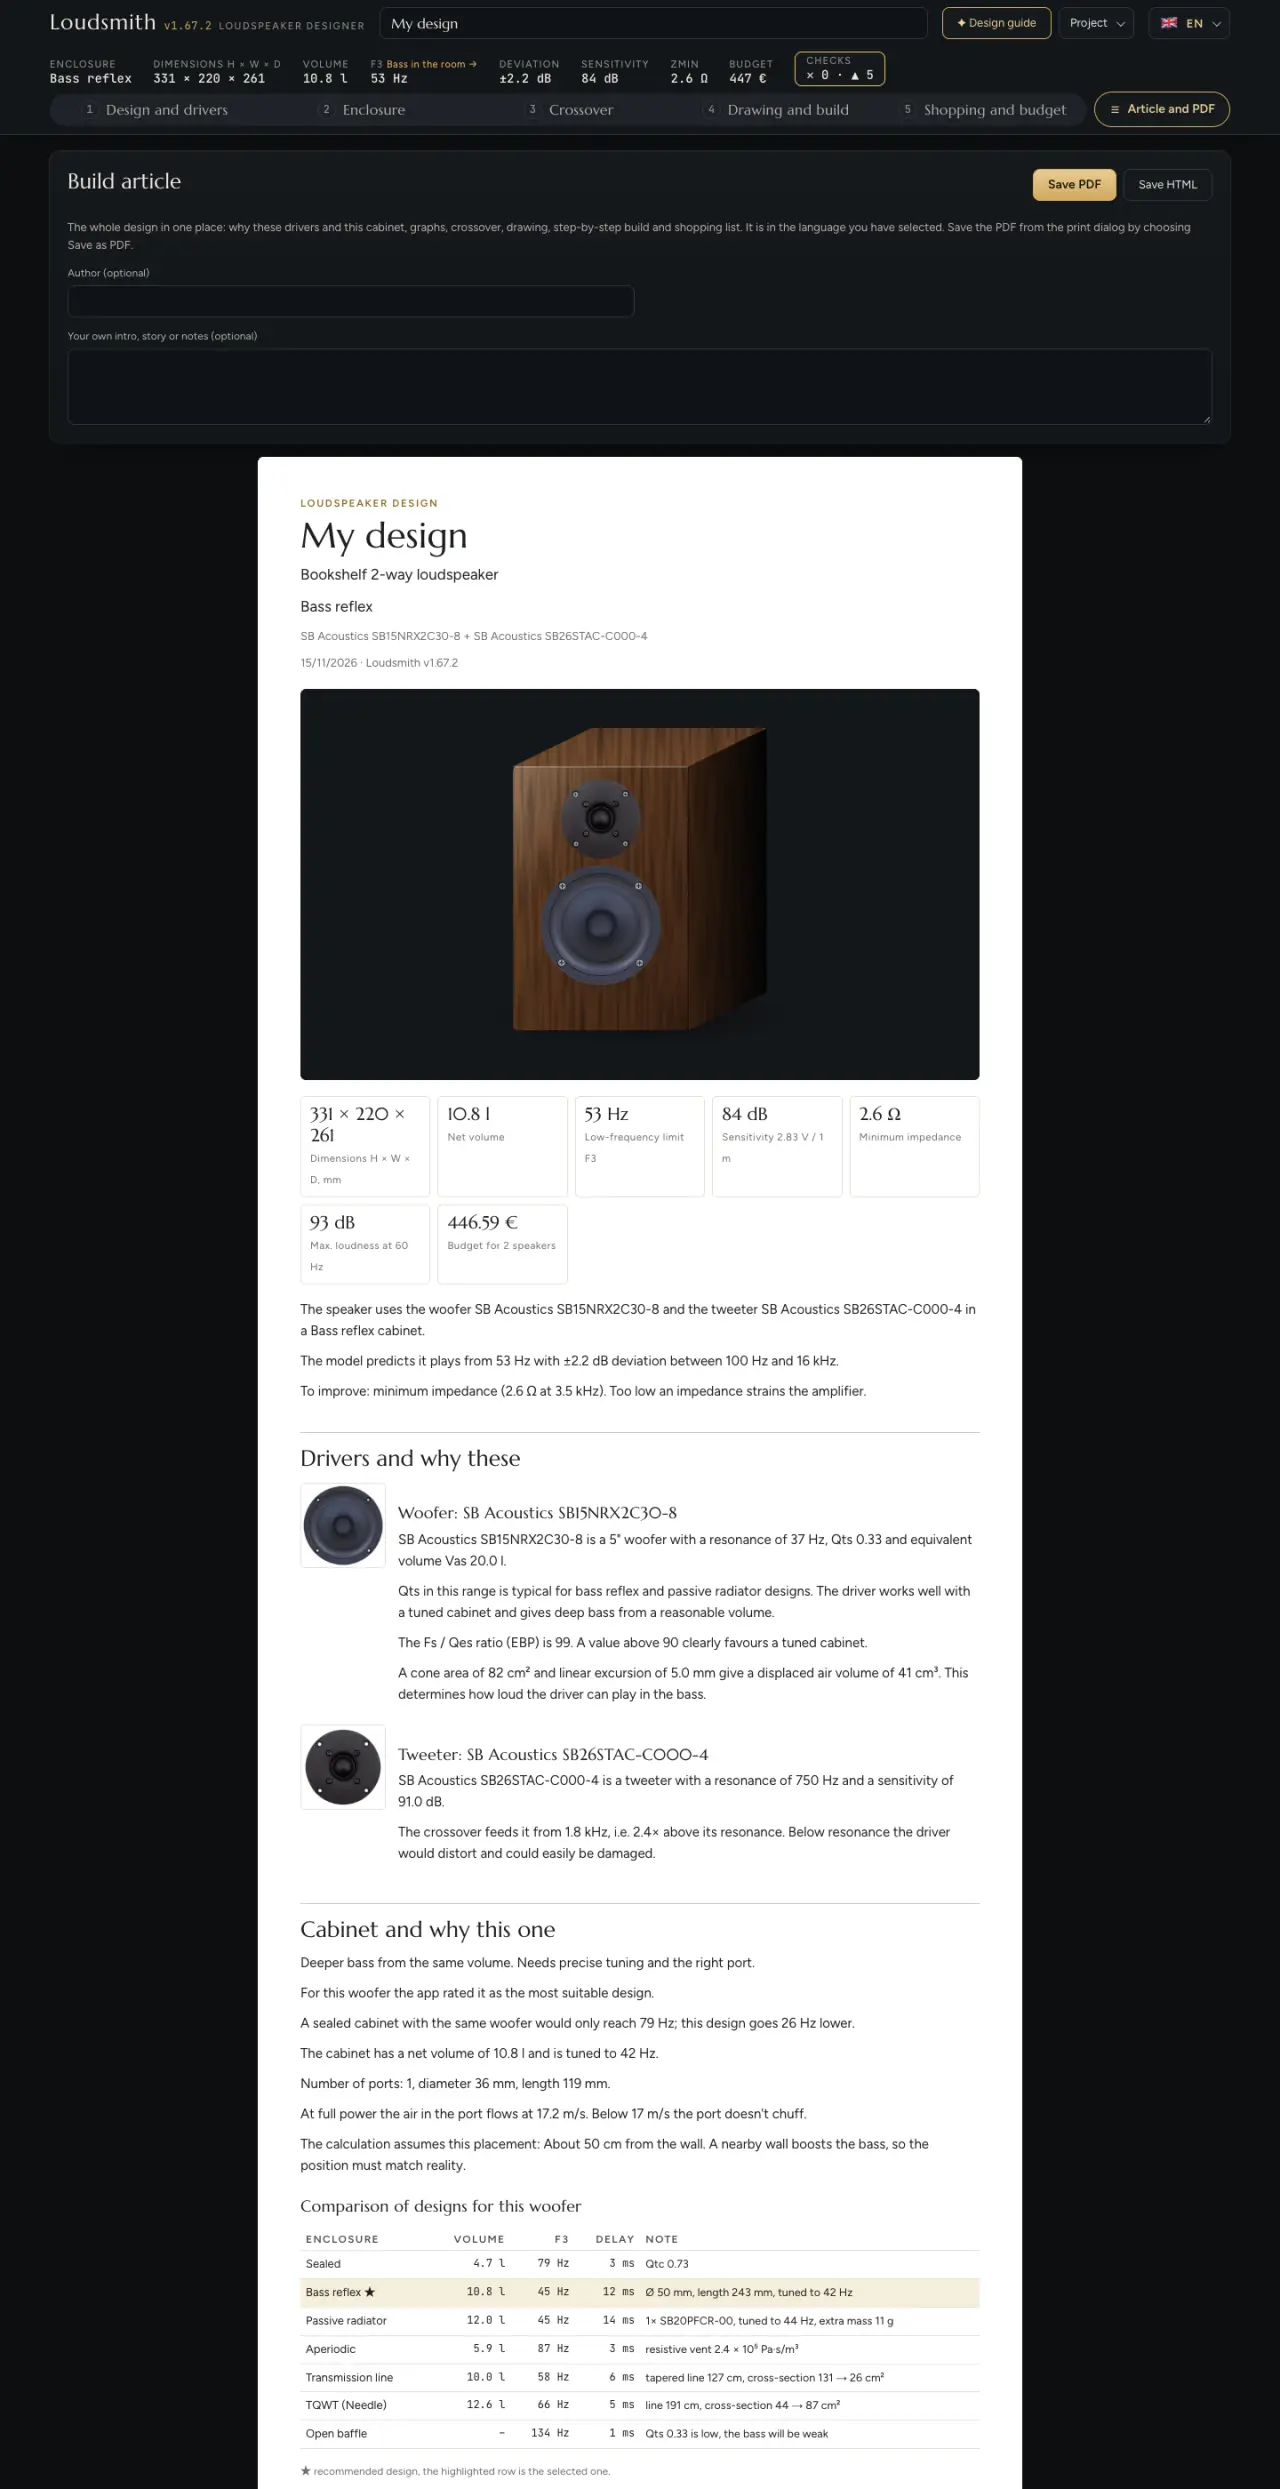
The whole design as one article in the chosen language: the drivers and why these ones, the cabinet and the comparison of enclosure types, frequency response and impedance, the crossover with its parts (or the Hypex settings), drawing and cut list, room and placement, step-by-step build, shopping list and design check.
- Author (optional)
- Shown under the title. Saved with the project.
- Your own intro, story or notes
- A paragraph below the summary figures (up to 4000 characters). Saved with the project.
- Save PDF
- In the browser, opens the print dialog where you choose “Save as PDF” (A4). In the iPad and Mac app it creates the PDF directly.
- Save HTML
- The article as a single file. Fonts and photos are loaded from the internet.
Apart from the author and the intro, the article cannot be edited: it always matches the current design.
Tips and FAQ
- How do I back up my design?
- Project → Export project. The file contains everything, including measurements, photos and the PCB. The library in the browser and the automatic saving exist only in this browser.
- Why did my crossover change?
- In Automatic mode the crossover is redesigned every time the drivers, cabinet or placement change. If you want to keep the values, switch to Manual.
- The results differ from my measurements.
- The model does not know about cone break-up, exact diffraction or the room. Load FRD and ZMA measurements of the drivers in the Crossover step and the crossover will be designed from them.
- Where is the PDF of the drawing?
- The drawing is saved as SVG. You can save the whole design, including the drawing and cut list, as a PDF in the Article and PDF tool.
Loudsmith
Loudsmith is a free loudspeaker designer with a room planner and speaker measurement.
- Website
- loudsmith.net
- App
- loudsmith.net/app
- Manual online
- loudsmith.net/manual
- Facebook group
- facebook.com/groups/2231972681031939
- Contact
- the “Write to me” form at the bottom of the website
The designer and the room planner show model predictions. Before you build, check them with a measurement or with other software such as VituixCAD or WinISD.
© 2026 Miloš Kráľ. All rights reserved. This manual covers Loudsmith v1.71.0.